> ## Documentation Index
> Fetch the complete documentation index at: https://docs.cernel.com/llms.txt
> Use this file to discover all available pages before exploring further.
# Cernel Taxonomy
> Organize your product catalog into a structured category hierarchy that drives AI enrichment.
The Cernel Taxonomy is a hierarchical category structure maintained by Cernel. When you import your products, Cernel automatically classifies each one into the right category, like *Apparel > Shoes > Running Shoes*. You then decide which attributes and AI agents apply at each level of the tree, so every product type gets the right content, generated the right way, without you having to organize the catalog by hand.
## How it works
The Cernel Taxonomy is a hierarchical tree of categories maintained by Cernel. When your products are imported, Cernel automatically classifies each product into the appropriate category in the tree, so your catalog is organized without any manual setup on your side. Each product in Cernel belongs to a category in this tree.
Categories are more than just labels. They determine which attributes exist for a product and which AI agents generate those attribute values. When you add an attribute to a category, say "Meta Description" to *Shoes*, that attribute automatically applies to all subcategories beneath it, like *Running Shoes*, *Casual Shoes*, and *Boots*. You configure once at the right level, and it cascades down.
This means a running shoe automatically gets the same attribute structure as every other shoe, but you can also add attributes specific to *Running Shoes* (like "Cushioning Type") without affecting the rest of the tree.
### Why you would use this
Products of the same type always have the same attributes. No more missing descriptions on some products while others have full detail.
Set up attributes and agents at a parent category and they automatically apply to every subcategory. Change a prompt for "Shoes" and every shoe product in your catalog picks up the update.
**Key concept: Categories and attributes.** Attributes set at a parent category automatically apply to all subcategories. You don't need to configure the same attribute on every individual category. Set it at the right level and it flows down the tree.
## Step-by-step guide
### Viewing your taxonomy
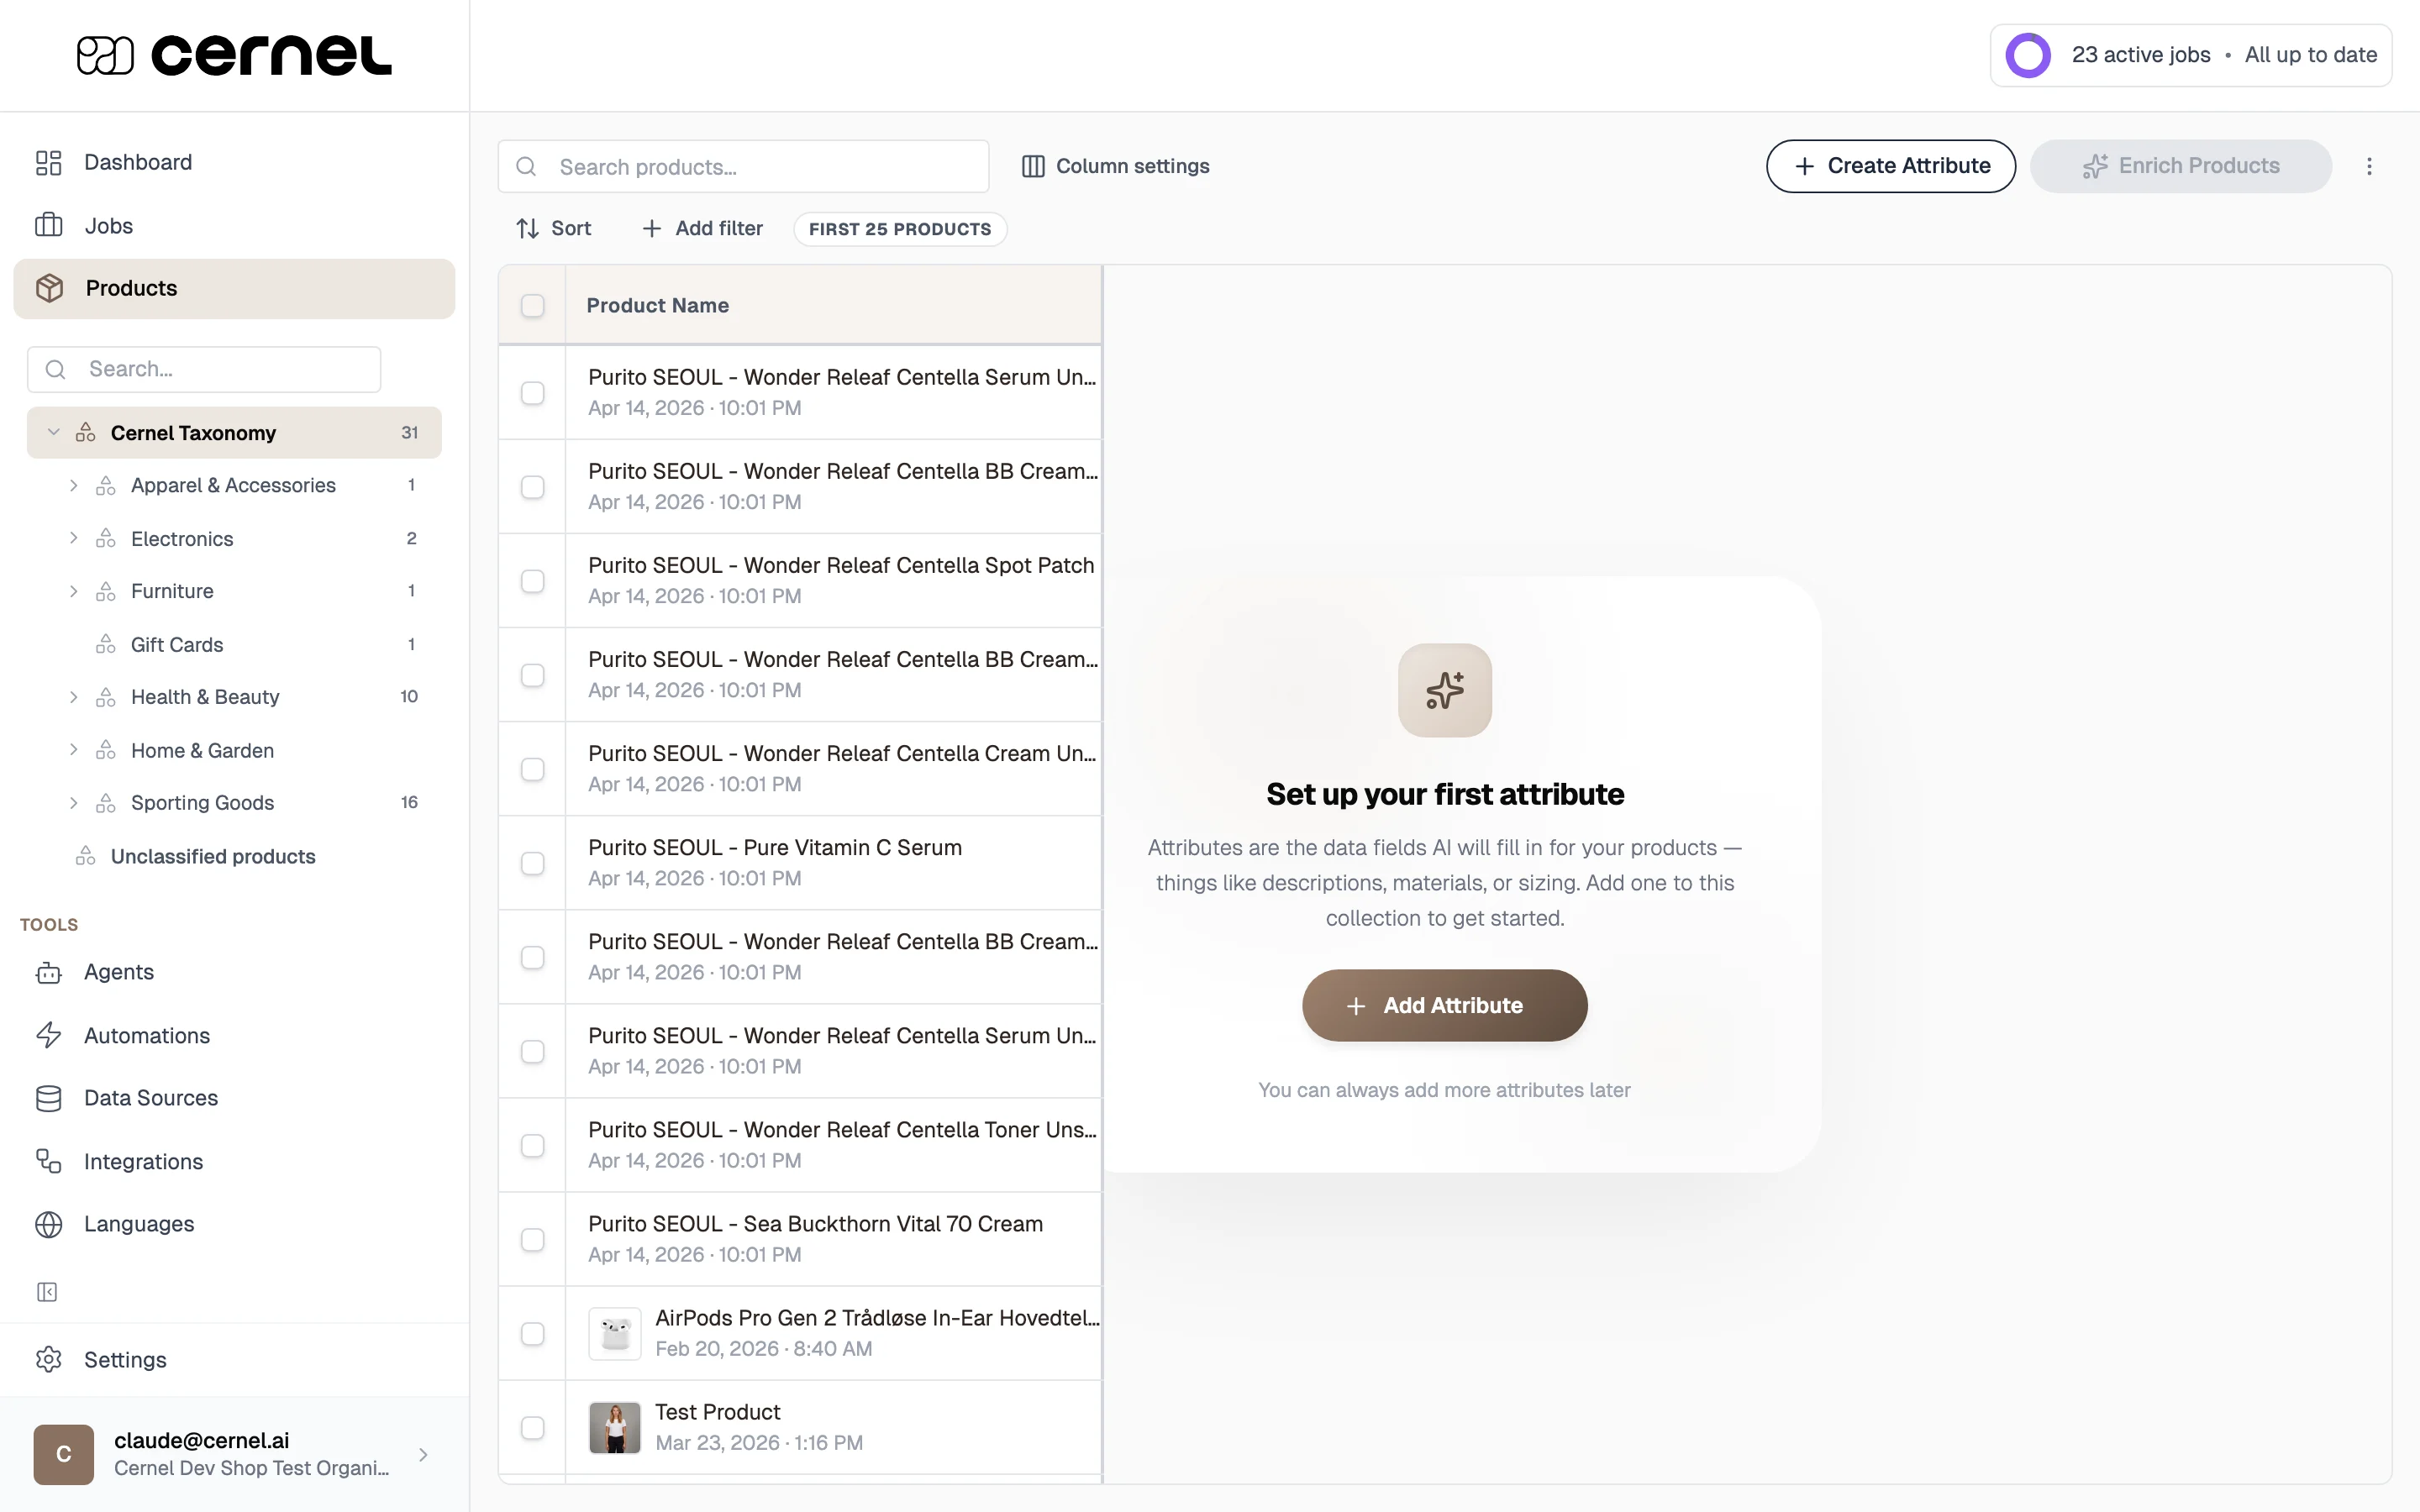
In the left sidebar, look under **Catalog**. Your taxonomy tree is displayed here, showing all categories and their nested subcategories. Click any category to expand it and see its children.
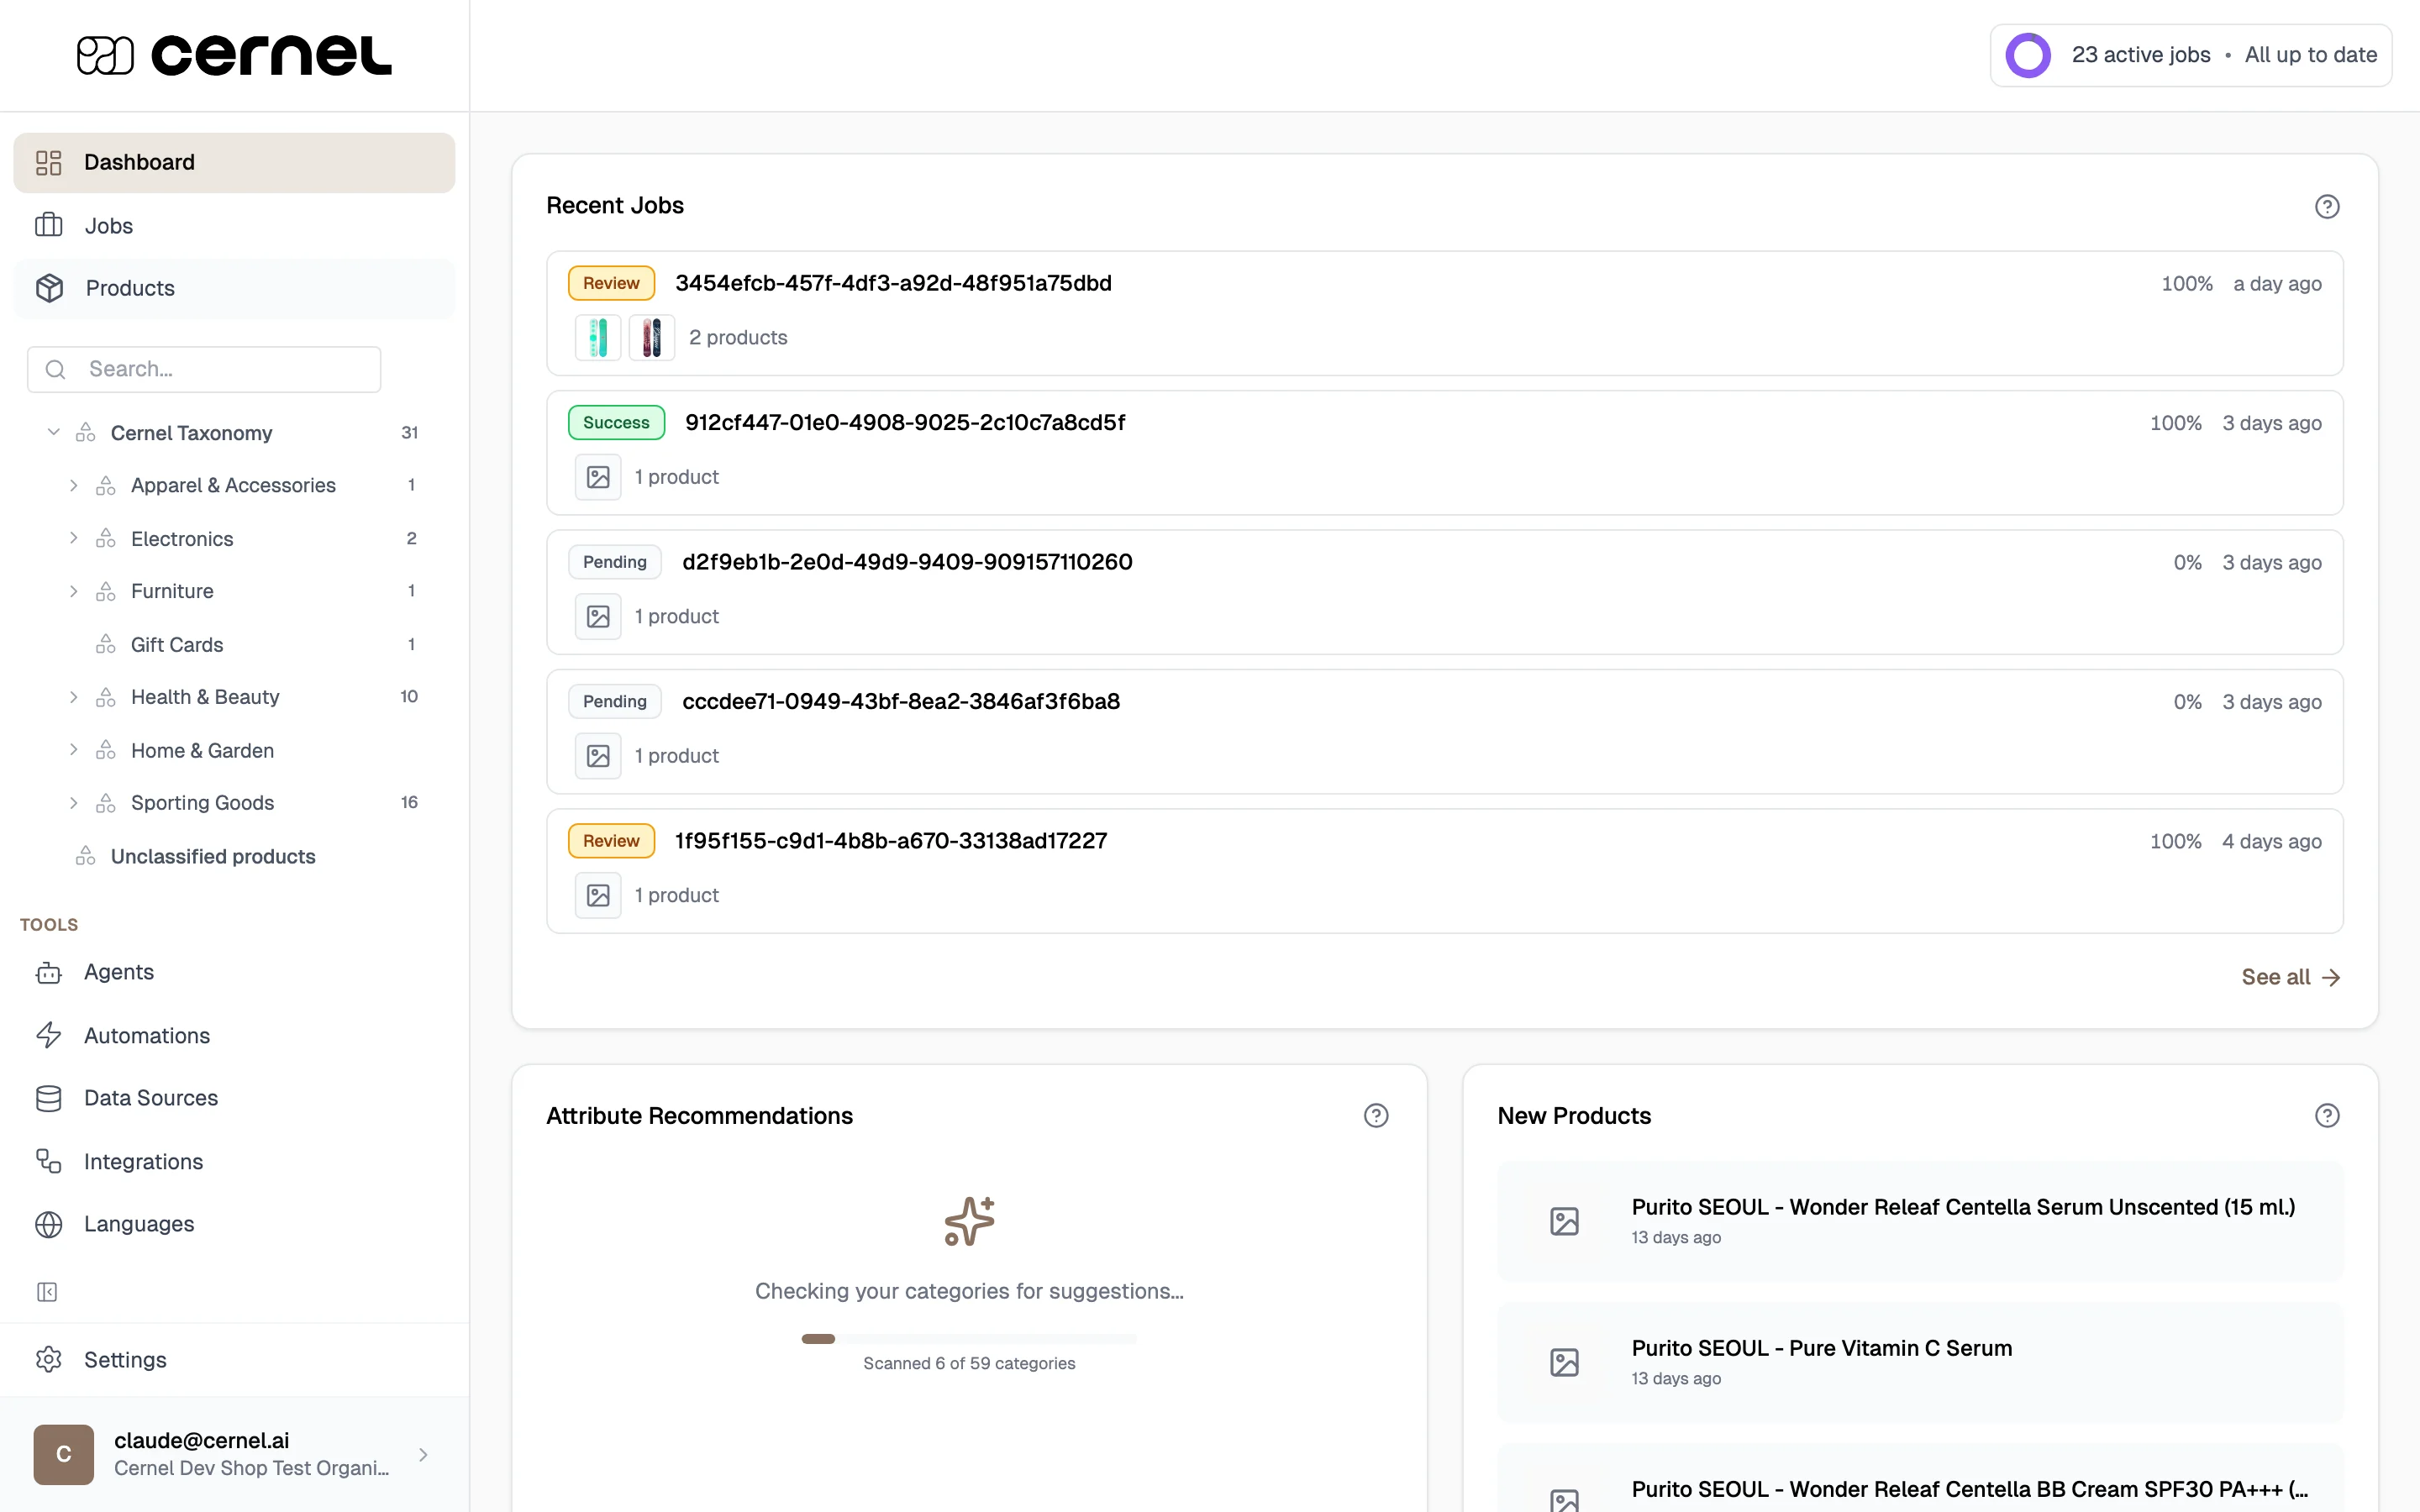 Click on a category name to view the products within it. The main content area shows a product table filtered to that category, with columns for each configured attribute.
 ### Planning where to place your attributes
The Cernel Taxonomy is already built and your products are already classified into it. Your job is to decide at which level of the tree each attribute belongs, so the attribute applies to exactly the right set of products:
* **Top level** (e.g., *All Products*): Meta Title, Meta Description, since every product needs these
* **Mid level** (e.g., *Apparel*): Materials, Care Instructions, since all clothing needs these
* **Leaf level** (e.g., *Running Shoes*): Cushioning Type, Drop Height, since only this product type needs these
Think in terms of "what content does this product type need?" Place broadly useful attributes high in the tree so they apply to many products at once, and place specialized attributes further down where they only affect the relevant product types.
### Configuring category attributes
With a category selected, click to view its **Category Attributes**. This shows all attributes configured for this category, including those applied from parent categories.
Attributes show a source badge indicating where they come from. If an attribute was set on a parent category, you'll see "Inherited from \[Parent Name]", meaning it was configured higher up in the tree and applies here automatically.
Click **Create Attribute** to create a new attribute for this category. Choose the attribute type, give it a name, and configure its settings.
Available attribute types:
* **Text**: Plain text content (descriptions, meta titles)
* **HTML**: Rich formatted content with HTML markup
* **Single Select**: One value from a predefined list (e.g., Gender)
* **Multi Select**: Multiple values from a predefined list (e.g., Materials)
* **External Data**: Data fetched from an external source
* **Media**: Image content generated or sourced by AI
After creating the attribute, link an AI agent to it. The agent defines how AI generates values for this attribute. Click the settings icon on the attribute row and select an agent from your configured agents.
You've configured an attribute on this category. It now applies to all subcategories beneath it, and the linked agent will generate values when you run enrichment on products in these categories.
### Using AI recommendations
The **AI Recommendations** widget on the Dashboard analyzes your taxonomy and suggests attributes that could improve your product data. It shows which categories could benefit and what attributes to add.
You can:
* **Apply all**: add all recommended attributes at once
* **Review individually**: open each recommendation to see what it suggests and decide whether to apply it
Recommendations are based on your product data and category structure. They're a good starting point, especially when setting up a new taxonomy.
## Advanced configuration
When you add an attribute to a category, it automatically applies to all subcategories beneath it. For example, adding "Meta Description" to *Apparel & Accessories* means every subcategory (*Shoes*, *Tops*, *Accessories*, and all their children) will have that attribute.
You can also add attributes at a more specific level. Adding "Cushioning Type" to *Running Shoes* makes that attribute available only for running shoes and any categories nested below it, without affecting *Casual Shoes* or other siblings.
This lets you define common attributes at the top of the tree and specialized attributes further down, keeping your configuration minimal and your product data consistent.
If a parent category has an attribute linked to an agent, subcategories use that same agent by default. However, you can override this by linking a different agent to the same attribute on a subcategory. The subcategory's agent takes precedence for products in that specific category.
This is useful when you need slightly different prompts for different product types, for example a general "Product Description" agent for *Shoes* but a more technical version for *Running Shoes*.
You can enrich all products in a category at once. Select the category, then use the enrichment action to generate attribute values for all products within it. This is more efficient than enriching products one by one.
The enrichment modal lets you choose which attributes to generate and see how many products will be affected.
Removing an attribute from a category also removes it from all subcategories beneath it. Existing generated values for products in those categories will be deleted. Make sure you want to remove the attribute from the entire branch before confirming.
## Frequently asked questions
Yes. You can link different agents to the same attribute on different categories. Each category can have its own agent generating content tailored to that product type.
Attributes set at a parent category automatically apply to all subcategories. Check the source badge on each attribute, which shows which parent category the attribute comes from. You don't need to remove or reconfigure these; they're working as designed.
The taxonomy supports multiple levels of nesting. You can control how many levels of categories are displayed in the sidebar under **Settings > Platform**.
Cernel automatically classifies your products into the Cernel Taxonomy on import, so the taxonomy itself is set up for you. On top of that, Cernel analyzes your categories and suggests which ones could benefit from additional AI-generated attributes. You'll see these suggestions when Cernel scans your categories for improvement opportunities.
The built-in Cernel Taxonomy is the same for every Cernel customer, so its category names are fixed and can't be renamed. A category's name is set when the category is created and isn't editable afterward. For a built-in category you also can't edit its description. What you can adjust is its **Additional Instructions**, the guidance that tells the AI how to sort products into that category's subcategories.
## What's next
Build your own category hierarchies and let AI classify products into them.
Create and configure the AI agents that generate content for your taxonomy's attributes.
Import your Shopify catalog so you have products to classify into your taxonomy.
### Planning where to place your attributes
The Cernel Taxonomy is already built and your products are already classified into it. Your job is to decide at which level of the tree each attribute belongs, so the attribute applies to exactly the right set of products:
* **Top level** (e.g., *All Products*): Meta Title, Meta Description, since every product needs these
* **Mid level** (e.g., *Apparel*): Materials, Care Instructions, since all clothing needs these
* **Leaf level** (e.g., *Running Shoes*): Cushioning Type, Drop Height, since only this product type needs these
Think in terms of "what content does this product type need?" Place broadly useful attributes high in the tree so they apply to many products at once, and place specialized attributes further down where they only affect the relevant product types.
### Configuring category attributes
With a category selected, click to view its **Category Attributes**. This shows all attributes configured for this category, including those applied from parent categories.
Attributes show a source badge indicating where they come from. If an attribute was set on a parent category, you'll see "Inherited from \[Parent Name]", meaning it was configured higher up in the tree and applies here automatically.
Click **Create Attribute** to create a new attribute for this category. Choose the attribute type, give it a name, and configure its settings.
Available attribute types:
* **Text**: Plain text content (descriptions, meta titles)
* **HTML**: Rich formatted content with HTML markup
* **Single Select**: One value from a predefined list (e.g., Gender)
* **Multi Select**: Multiple values from a predefined list (e.g., Materials)
* **External Data**: Data fetched from an external source
* **Media**: Image content generated or sourced by AI
After creating the attribute, link an AI agent to it. The agent defines how AI generates values for this attribute. Click the settings icon on the attribute row and select an agent from your configured agents.
You've configured an attribute on this category. It now applies to all subcategories beneath it, and the linked agent will generate values when you run enrichment on products in these categories.
### Using AI recommendations
The **AI Recommendations** widget on the Dashboard analyzes your taxonomy and suggests attributes that could improve your product data. It shows which categories could benefit and what attributes to add.
You can:
* **Apply all**: add all recommended attributes at once
* **Review individually**: open each recommendation to see what it suggests and decide whether to apply it
Recommendations are based on your product data and category structure. They're a good starting point, especially when setting up a new taxonomy.
## Advanced configuration
When you add an attribute to a category, it automatically applies to all subcategories beneath it. For example, adding "Meta Description" to *Apparel & Accessories* means every subcategory (*Shoes*, *Tops*, *Accessories*, and all their children) will have that attribute.
You can also add attributes at a more specific level. Adding "Cushioning Type" to *Running Shoes* makes that attribute available only for running shoes and any categories nested below it, without affecting *Casual Shoes* or other siblings.
This lets you define common attributes at the top of the tree and specialized attributes further down, keeping your configuration minimal and your product data consistent.
If a parent category has an attribute linked to an agent, subcategories use that same agent by default. However, you can override this by linking a different agent to the same attribute on a subcategory. The subcategory's agent takes precedence for products in that specific category.
This is useful when you need slightly different prompts for different product types, for example a general "Product Description" agent for *Shoes* but a more technical version for *Running Shoes*.
You can enrich all products in a category at once. Select the category, then use the enrichment action to generate attribute values for all products within it. This is more efficient than enriching products one by one.
The enrichment modal lets you choose which attributes to generate and see how many products will be affected.
Removing an attribute from a category also removes it from all subcategories beneath it. Existing generated values for products in those categories will be deleted. Make sure you want to remove the attribute from the entire branch before confirming.
## Frequently asked questions
Yes. You can link different agents to the same attribute on different categories. Each category can have its own agent generating content tailored to that product type.
Attributes set at a parent category automatically apply to all subcategories. Check the source badge on each attribute, which shows which parent category the attribute comes from. You don't need to remove or reconfigure these; they're working as designed.
The taxonomy supports multiple levels of nesting. You can control how many levels of categories are displayed in the sidebar under **Settings > Platform**.
Cernel automatically classifies your products into the Cernel Taxonomy on import, so the taxonomy itself is set up for you. On top of that, Cernel analyzes your categories and suggests which ones could benefit from additional AI-generated attributes. You'll see these suggestions when Cernel scans your categories for improvement opportunities.
The built-in Cernel Taxonomy is the same for every Cernel customer, so its category names are fixed and can't be renamed. A category's name is set when the category is created and isn't editable afterward. For a built-in category you also can't edit its description. What you can adjust is its **Additional Instructions**, the guidance that tells the AI how to sort products into that category's subcategories.
## What's next
Build your own category hierarchies and let AI classify products into them.
Create and configure the AI agents that generate content for your taxonomy's attributes.
Import your Shopify catalog so you have products to classify into your taxonomy.