> ## Documentation Index
> Fetch the complete documentation index at: https://docs.cernel.com/llms.txt
> Use this file to discover all available pages before exploring further.
# Data Sources
> Build a context library of brand guidelines, product rules, and reference material that your AI agents use to generate on-brand content.
Data Sources are your organization's context library. Store brand voice guidelines, product specifications, target audience descriptions, and other reference material in one place, then reference it in your AI agent prompts. This means your agents always have the context they need to generate content that matches your brand - without pasting the same information into every prompt.
## How it works
Data Sources is a file-and-folder system inside Cernel where you organize reusable context. You create folders to group related information (like "Brand Guidelines" or "Product Rules"), then add entries inside them - either text content or images.
When writing an agent prompt, you type `/` to insert a Data Source reference. Cernel injects the referenced content directly into the prompt at generation time. Update a Data Source entry once, and every agent referencing it automatically uses the latest version.
### Why you would use this
Instead of pasting your full brand guide into every agent prompt, store it once and reference it. Your prompts stay focused on instructions, not context.
Change your brand voice? Update the Data Source entry and every agent that references it picks up the change. No need to edit dozens of prompts individually.
**Key concept:** Data Sources are NOT integrations. They are organizational context that enriches AI output quality. They don't import or export product data - they provide the background knowledge your agents need to write well.
## Setting up Data Sources
Go to **Tools > Data Sources** in the sidebar. You'll see an explorer view with a folder tree on the left and a content panel on the right.
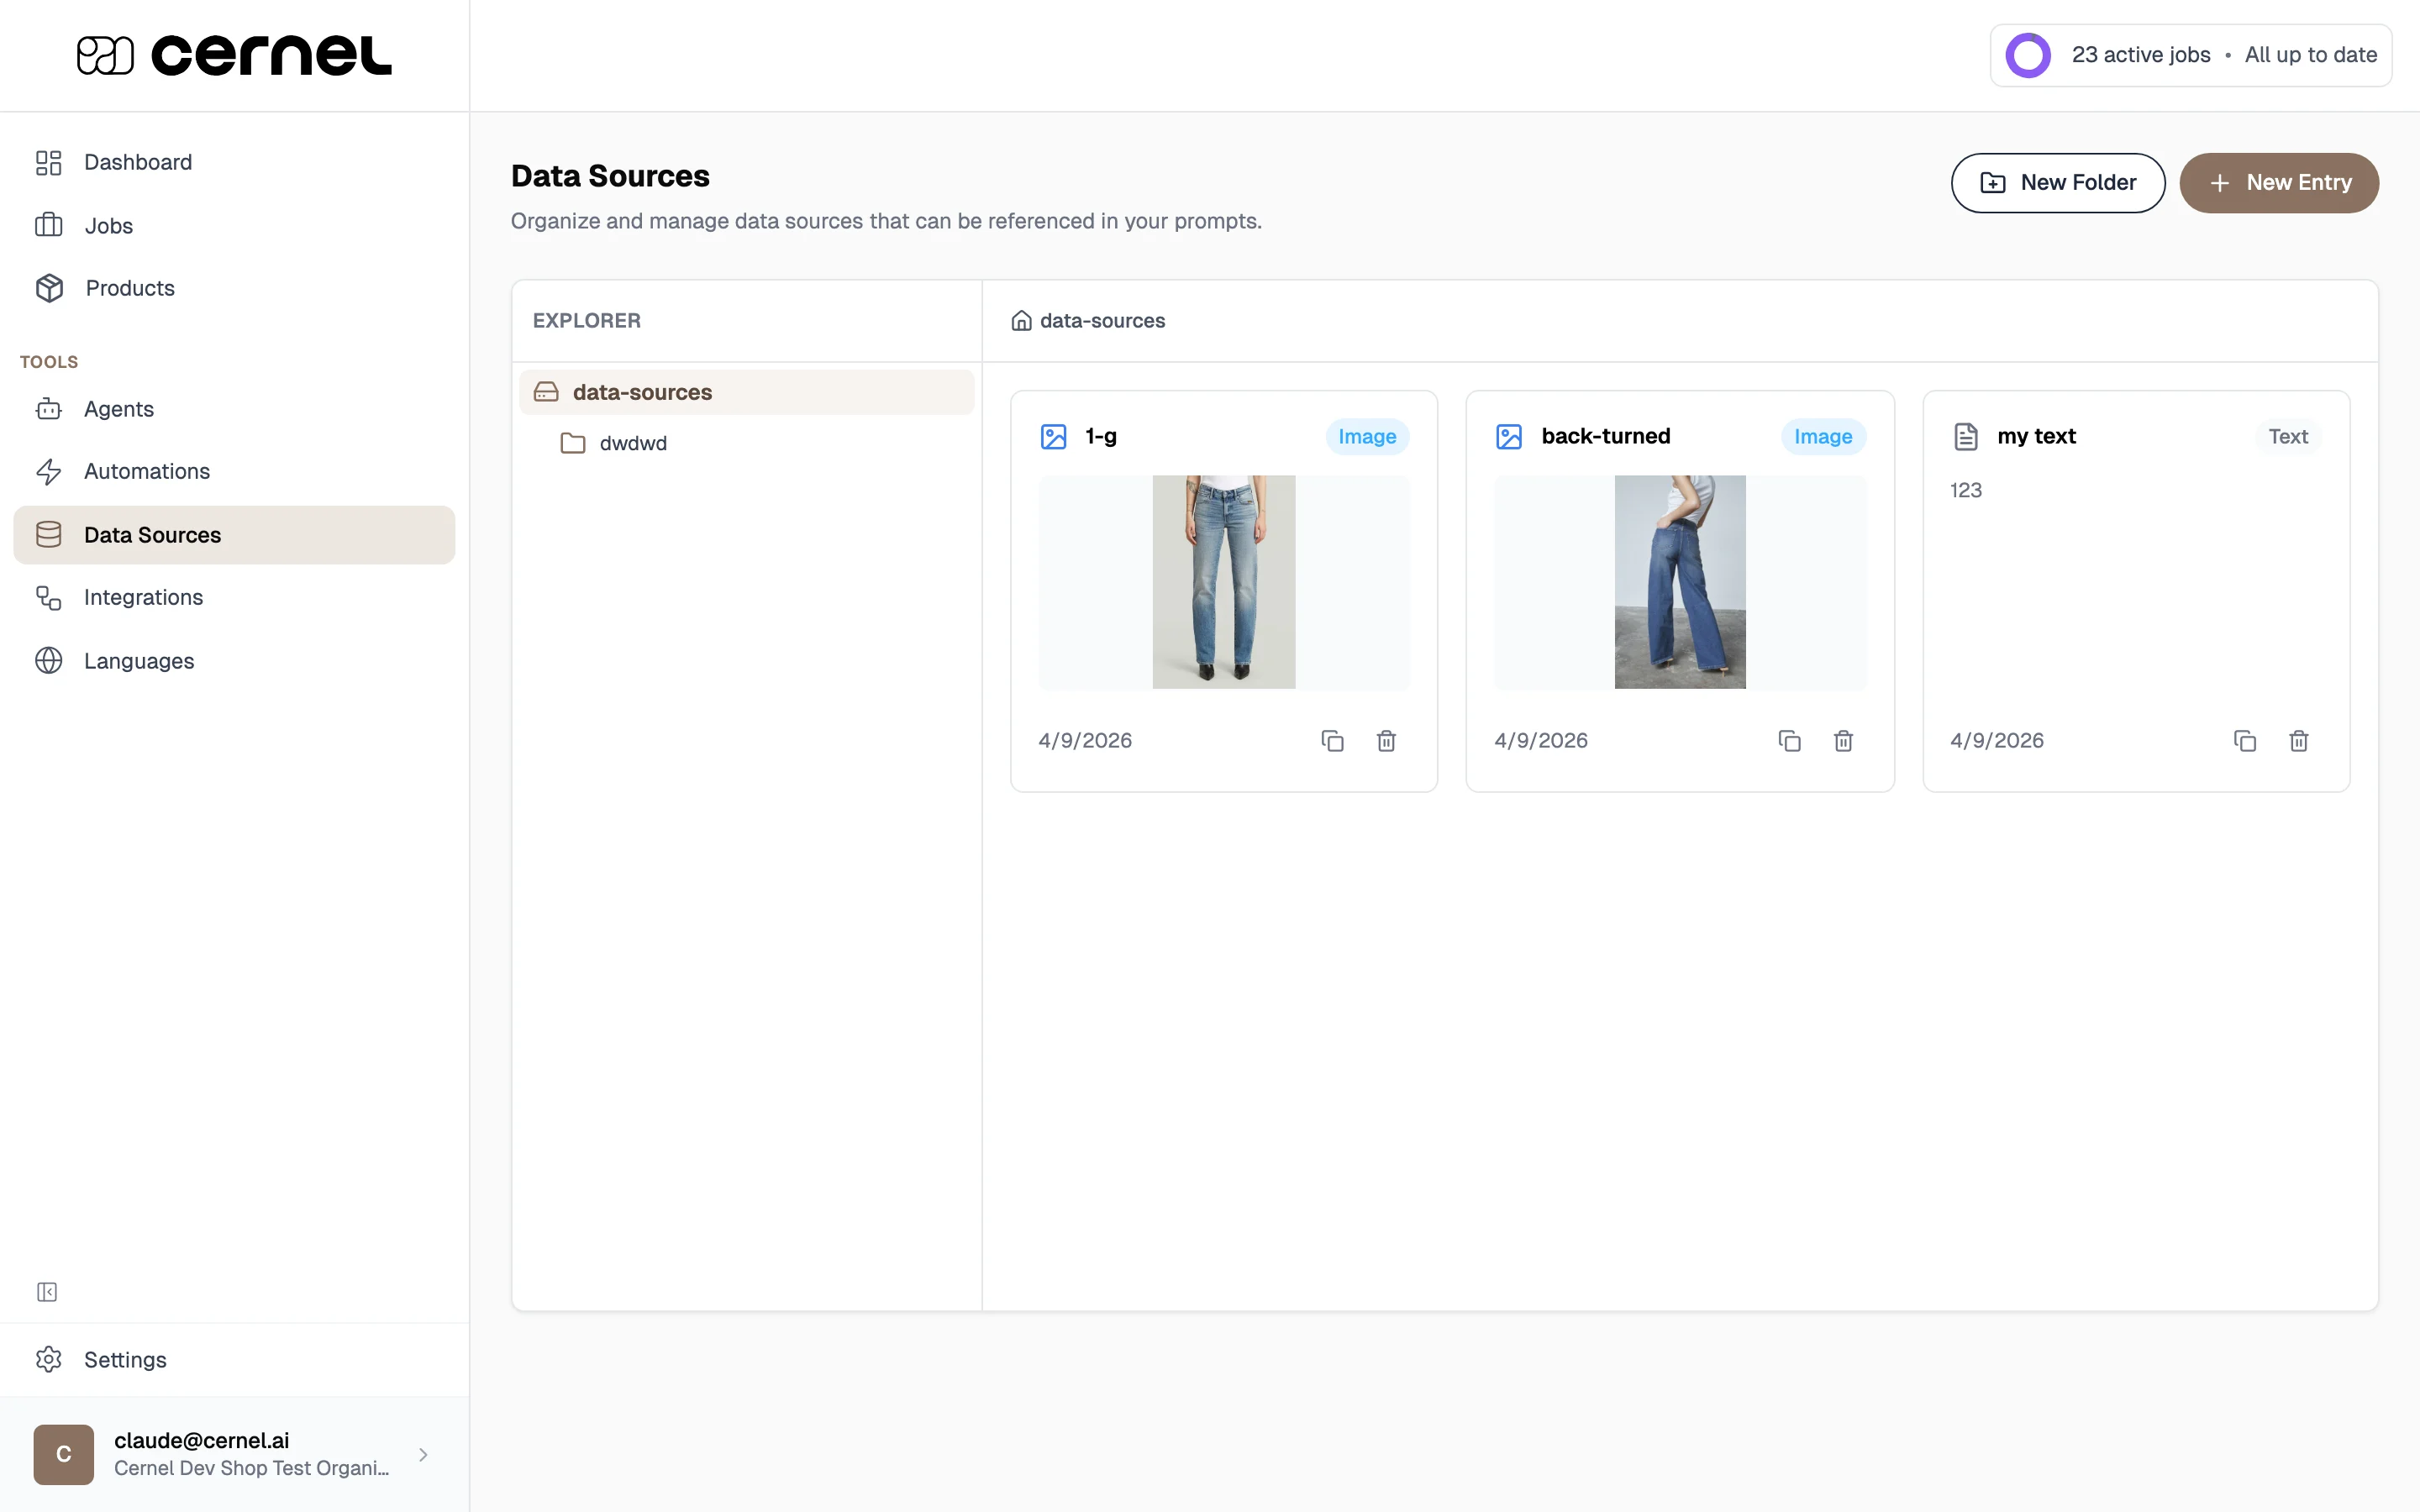 Click **New Folder** to organize your data sources. Give the folder a descriptive name like "Brand Guidelines" or "Product Rules". Folders help you group related entries and keep your context library organized.
Folder and entry names determine the display name shown on the pill in the prompt editor. Choose clear, descriptive names.
Select your folder, then click **New Entry**. You can add two types of entries:
* **Text entries** - Paste or type your brand guidelines, product rules, audience descriptions, or any text content. You can also upload plain-text files (`.txt`, `.md`) instead of pasting.
* **Image entries** - Upload reference images like brand logos, style guides, or product photography standards
You can also drag and drop files directly into the upload area. The drop zone lists the formats it accepts: **PNG, JPG, JPEG, GIF, WEBP, SVG, TXT, and MD**. If you drop a file in an unsupported format, Cernel skips it and tells you which formats are accepted, so nothing is silently discarded.
When writing an agent prompt, type `/` to open the reference menu. Select your Data Source entry and it appears as a styled **pill** in the prompt editor: a labeled badge showing the entry's display name.
Click **New Folder** to organize your data sources. Give the folder a descriptive name like "Brand Guidelines" or "Product Rules". Folders help you group related entries and keep your context library organized.
Folder and entry names determine the display name shown on the pill in the prompt editor. Choose clear, descriptive names.
Select your folder, then click **New Entry**. You can add two types of entries:
* **Text entries** - Paste or type your brand guidelines, product rules, audience descriptions, or any text content. You can also upload plain-text files (`.txt`, `.md`) instead of pasting.
* **Image entries** - Upload reference images like brand logos, style guides, or product photography standards
You can also drag and drop files directly into the upload area. The drop zone lists the formats it accepts: **PNG, JPG, JPEG, GIF, WEBP, SVG, TXT, and MD**. If you drop a file in an unsupported format, Cernel skips it and tells you which formats are accepted, so nothing is silently discarded.
When writing an agent prompt, type `/` to open the reference menu. Select your Data Source entry and it appears as a styled **pill** in the prompt editor: a labeled badge showing the entry's display name.
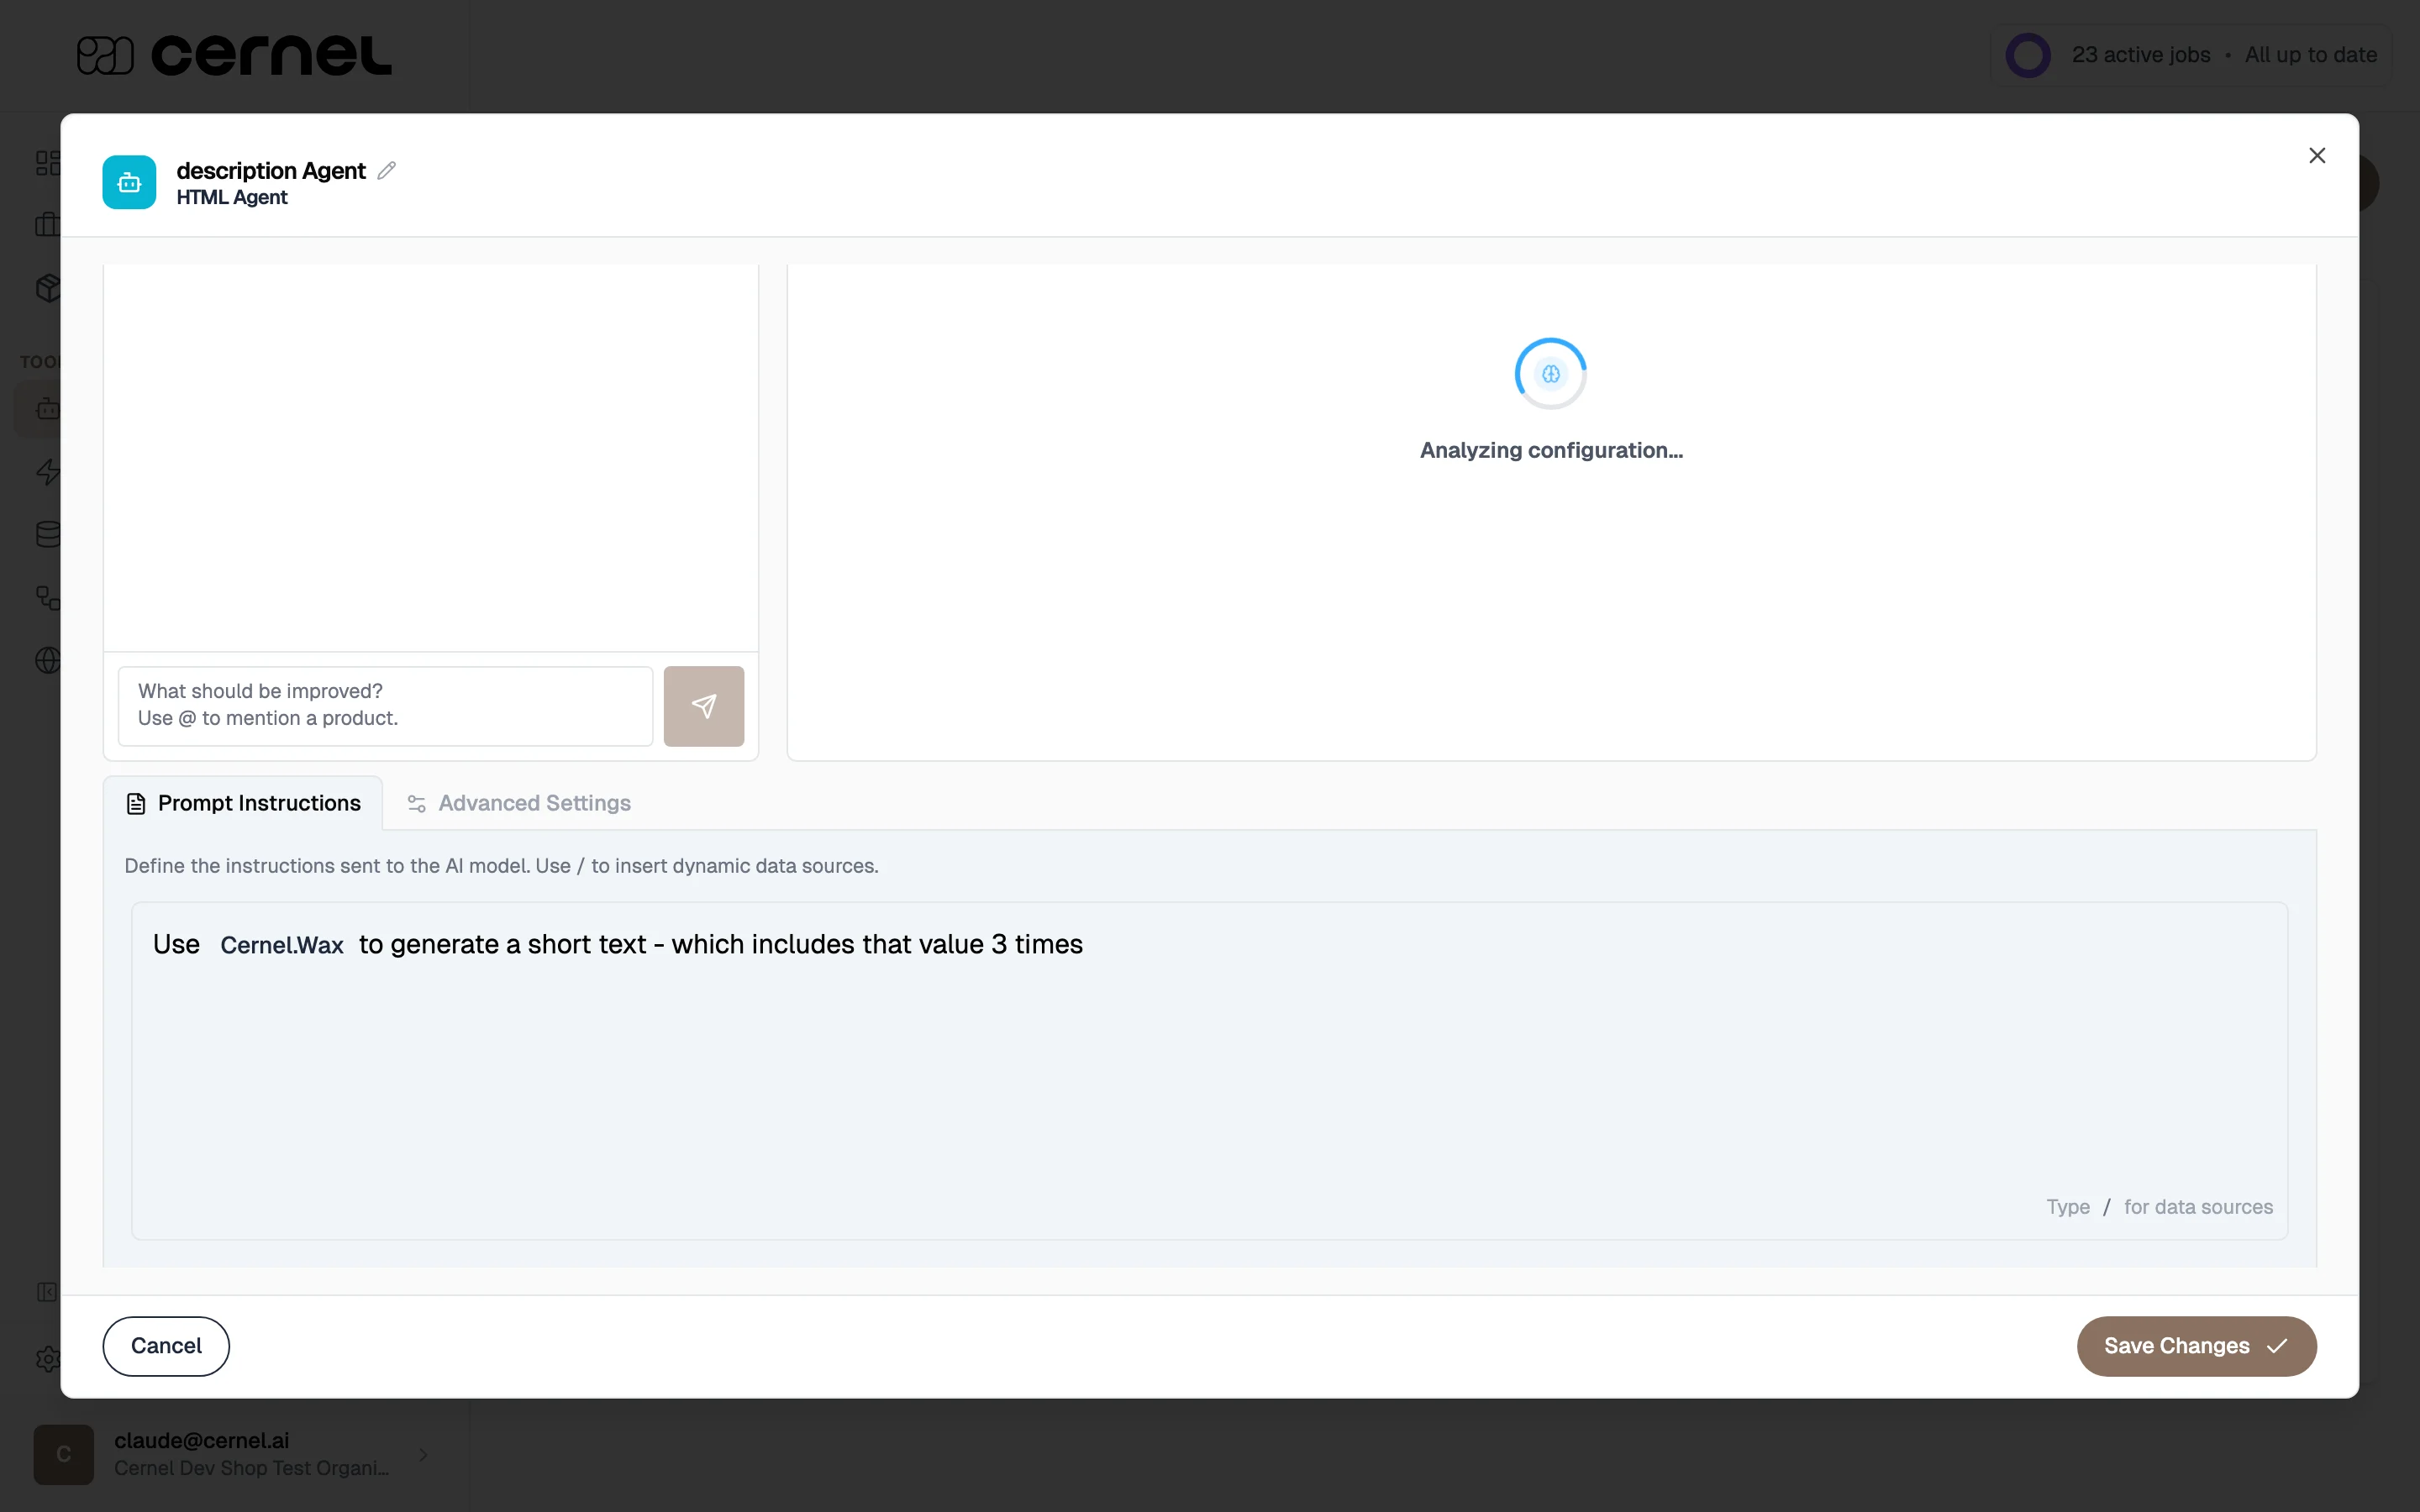 Your Data Source is ready. Reference it in any agent prompt by typing `/` and selecting it from the autocomplete menu. The pill makes it easy to see which references are included at a glance.
## Organizing your library
A clean folder structure makes Data Sources easy to find and reference. A recommended structure:
```
data-sources/
├── brand/
│ ├── voice → Brand tone and style rules
│ ├── audience → Target customer description
│ └── values → Brand values and mission
├── product-rules/
│ ├── footwear → Footwear-specific content rules
│ ├── apparel → Apparel-specific content rules
│ └── accessories → Accessories-specific content rules
├── compliance/
│ ├── claims → Claims to avoid
│ └── certifications → Required certification language
└── seo/
├── meta-rules → Meta title/description rules
└── keywords → Priority keywords
```
Keep entries focused. One entry per topic is better than one massive entry covering everything. Focused entries let you reference exactly the context each agent needs, no more, no less.
## Writing effective entries
Instead of "write in our brand voice," give concrete instructions:
**Less effective:**
> "Use our brand voice when writing product descriptions."
**More effective:**
> "Tone: Warm and knowledgeable, like a trusted friend who happens to be an expert. Use contractions (we're, you'll). Address the customer directly (you, your). Avoid: superlatives (best, finest), corporate language (leverage, synergy), and exclamation marks."
Examples are more effective than abstract rules:
> "Product description example for running shoes: 'Built for the long run. The CloudStride features responsive foam cushioning that returns energy with every stride, while the breathable mesh upper keeps your feet cool from first mile to last. A reinforced heel counter provides stability without adding weight.'"
## Using Data Sources in prompts
Navigate to any agent or attribute configuration and open the prompt editor.
In the prompt text field, type `/`. An autocomplete menu appears showing your available Data Sources organized by folder. Select the entry you want to insert.
The reference appears as a labeled **pill** inline with your prompt text. When the AI runs, the pill's content is replaced with the actual Data Source entry.
A well-structured prompt with Data Source references might look like:
> Write a 120-150 word product description for this product.
> Follow the tone and style in `Brand Voice`. Write for the audience described in `Brand Audience`.
> Apply the content rules in `Footwear Rules`. Check against `Compliance Claims` before including any claims.
Each of the references above would appear as a pill in the prompt editor, clearly distinguishable from the surrounding instructions.
## Advanced configuration
You can create folders within folders to build a structured hierarchy. For example:
* `brand/` - Brand-level context
* `brand/voice` - Tone of voice guidelines
* `brand/audience` - Target audience description
* `legal/` - Compliance rules
* `legal/claims` - Claims to avoid
Each entry appears as its own labeled pill in the prompt editor, making it easy to see which context is being used.
The `/` autocomplete menu offers several reference categories beyond your custom Data Sources:
* **Product Data** - Reference all product attributes, or drill into specific ones like Product Title, Product Images, GTIN, or ID
* **Organization** - Reference organization-level properties like name, language, and site domain
* **Existing Attributes** - Reference other attribute values already generated on the same product
* **Custom Data Sources** - Your own folder/entry references from the Data Sources library
Each reference type inserts a labeled pill in the prompt editor, visually distinct from your instruction text.
Image entries are useful for providing visual references to AI agents - brand logos, style examples, or product photography standards. Upload images in PNG, JPG, GIF, WebP, or SVG format. You can add alt text to describe the image for accessibility and context.
Deleting a Data Source entry or folder will break any agent prompts that reference it. The reference will remain in the prompt text but won't inject any content. Check which prompts use a reference before deleting.
## Frequently asked questions
Common entries include:
* **Brand voice guide** - Tone, vocabulary, and style rules
* **Target audience** - Who you're writing for and what they care about
* **Product guidelines** - Category-specific content rules (materials to highlight, claims to avoid)
* **Compliance rules** - Legal requirements, prohibited claims
* **Competitor information** - Brands or terms to never mention
Click on any entry card in the explorer to open the edit modal. Change the display name, content, or image, then save. All agent prompts referencing this entry will automatically use the updated content the next time enrichment runs.
Yes. Insert as many references as you need. Each `/` insert adds another reference. For example, you might reference both your brand voice and product guidelines in the same agent prompt.
**Data Sources** are context - they provide information for the AI to use (brand guidelines, product rules). **Global Prompts** are instructions - they tell the AI how to behave across all agents (e.g., "never use superlatives"). Use Data Sources for what to know, and Global Prompts for what to do.
The upload area accepts image files (PNG, JPG, JPEG, GIF, WEBP, SVG) and plain-text files (TXT, MD). The accepted list is shown directly in the drop zone. Other formats - such as PDF, Word, or spreadsheet files - aren't supported; if you drop one, Cernel skips it and shows you which formats are accepted. For content in an unsupported format, copy the text into a **Text entry** instead.
## What's next
Create agents that reference your Data Sources to generate on-brand product content.
Run enrichment to generate content using your Data Sources and agents.
Your Data Source is ready. Reference it in any agent prompt by typing `/` and selecting it from the autocomplete menu. The pill makes it easy to see which references are included at a glance.
## Organizing your library
A clean folder structure makes Data Sources easy to find and reference. A recommended structure:
```
data-sources/
├── brand/
│ ├── voice → Brand tone and style rules
│ ├── audience → Target customer description
│ └── values → Brand values and mission
├── product-rules/
│ ├── footwear → Footwear-specific content rules
│ ├── apparel → Apparel-specific content rules
│ └── accessories → Accessories-specific content rules
├── compliance/
│ ├── claims → Claims to avoid
│ └── certifications → Required certification language
└── seo/
├── meta-rules → Meta title/description rules
└── keywords → Priority keywords
```
Keep entries focused. One entry per topic is better than one massive entry covering everything. Focused entries let you reference exactly the context each agent needs, no more, no less.
## Writing effective entries
Instead of "write in our brand voice," give concrete instructions:
**Less effective:**
> "Use our brand voice when writing product descriptions."
**More effective:**
> "Tone: Warm and knowledgeable, like a trusted friend who happens to be an expert. Use contractions (we're, you'll). Address the customer directly (you, your). Avoid: superlatives (best, finest), corporate language (leverage, synergy), and exclamation marks."
Examples are more effective than abstract rules:
> "Product description example for running shoes: 'Built for the long run. The CloudStride features responsive foam cushioning that returns energy with every stride, while the breathable mesh upper keeps your feet cool from first mile to last. A reinforced heel counter provides stability without adding weight.'"
## Using Data Sources in prompts
Navigate to any agent or attribute configuration and open the prompt editor.
In the prompt text field, type `/`. An autocomplete menu appears showing your available Data Sources organized by folder. Select the entry you want to insert.
The reference appears as a labeled **pill** inline with your prompt text. When the AI runs, the pill's content is replaced with the actual Data Source entry.
A well-structured prompt with Data Source references might look like:
> Write a 120-150 word product description for this product.
> Follow the tone and style in `Brand Voice`. Write for the audience described in `Brand Audience`.
> Apply the content rules in `Footwear Rules`. Check against `Compliance Claims` before including any claims.
Each of the references above would appear as a pill in the prompt editor, clearly distinguishable from the surrounding instructions.
## Advanced configuration
You can create folders within folders to build a structured hierarchy. For example:
* `brand/` - Brand-level context
* `brand/voice` - Tone of voice guidelines
* `brand/audience` - Target audience description
* `legal/` - Compliance rules
* `legal/claims` - Claims to avoid
Each entry appears as its own labeled pill in the prompt editor, making it easy to see which context is being used.
The `/` autocomplete menu offers several reference categories beyond your custom Data Sources:
* **Product Data** - Reference all product attributes, or drill into specific ones like Product Title, Product Images, GTIN, or ID
* **Organization** - Reference organization-level properties like name, language, and site domain
* **Existing Attributes** - Reference other attribute values already generated on the same product
* **Custom Data Sources** - Your own folder/entry references from the Data Sources library
Each reference type inserts a labeled pill in the prompt editor, visually distinct from your instruction text.
Image entries are useful for providing visual references to AI agents - brand logos, style examples, or product photography standards. Upload images in PNG, JPG, GIF, WebP, or SVG format. You can add alt text to describe the image for accessibility and context.
Deleting a Data Source entry or folder will break any agent prompts that reference it. The reference will remain in the prompt text but won't inject any content. Check which prompts use a reference before deleting.
## Frequently asked questions
Common entries include:
* **Brand voice guide** - Tone, vocabulary, and style rules
* **Target audience** - Who you're writing for and what they care about
* **Product guidelines** - Category-specific content rules (materials to highlight, claims to avoid)
* **Compliance rules** - Legal requirements, prohibited claims
* **Competitor information** - Brands or terms to never mention
Click on any entry card in the explorer to open the edit modal. Change the display name, content, or image, then save. All agent prompts referencing this entry will automatically use the updated content the next time enrichment runs.
Yes. Insert as many references as you need. Each `/` insert adds another reference. For example, you might reference both your brand voice and product guidelines in the same agent prompt.
**Data Sources** are context - they provide information for the AI to use (brand guidelines, product rules). **Global Prompts** are instructions - they tell the AI how to behave across all agents (e.g., "never use superlatives"). Use Data Sources for what to know, and Global Prompts for what to do.
The upload area accepts image files (PNG, JPG, JPEG, GIF, WEBP, SVG) and plain-text files (TXT, MD). The accepted list is shown directly in the drop zone. Other formats - such as PDF, Word, or spreadsheet files - aren't supported; if you drop one, Cernel skips it and shows you which formats are accepted. For content in an unsupported format, copy the text into a **Text entry** instead.
## What's next
Create agents that reference your Data Sources to generate on-brand product content.
Run enrichment to generate content using your Data Sources and agents.