> ## Documentation Index
> Fetch the complete documentation index at: https://docs.cernel.com/llms.txt
> Use this file to discover all available pages before exploring further.
# Your First Enrichment
> Generate AI-powered content for your products in minutes, from selecting products to reviewing results.
This guide walks you through running your first enrichment: selecting products, choosing attributes, generating content with AI, and reviewing the results. By the end, you'll have AI-generated product content ready to approve and push to your store.
If you're still iterating on the wording, tone, or behavior of an agent, do that work in the [Agent Sandbox](/features/sandbox) first, not in a full enrichment job. The sandbox runs your agent on real products, shows the AI's reasoning, and lets you refine the prompt through chat with undo/redo and version history. Enrichment is for applying a tested agent across your catalog, not for testing.
## Before you begin
To run an enrichment, you need:
1. **Products imported**: Connect an integration like [Shopify](/get-started/connecting-shopify) or import via CSV
2. **A taxonomy with attributes**: Products organized into categories with [attributes configured](/features/attributes)
3. **Agents linked to attributes**: At least one [AI agent](/features/ai-agents) linked to an attribute on your categories
If you're just getting started and Cernel has suggested attributes for your categories, you can apply those recommendations directly from the Dashboard.
## Step-by-step guide
In the sidebar under **Catalog**, expand the taxonomy tree and click on a category to view its products. You'll see a product table with columns for each configured attribute.
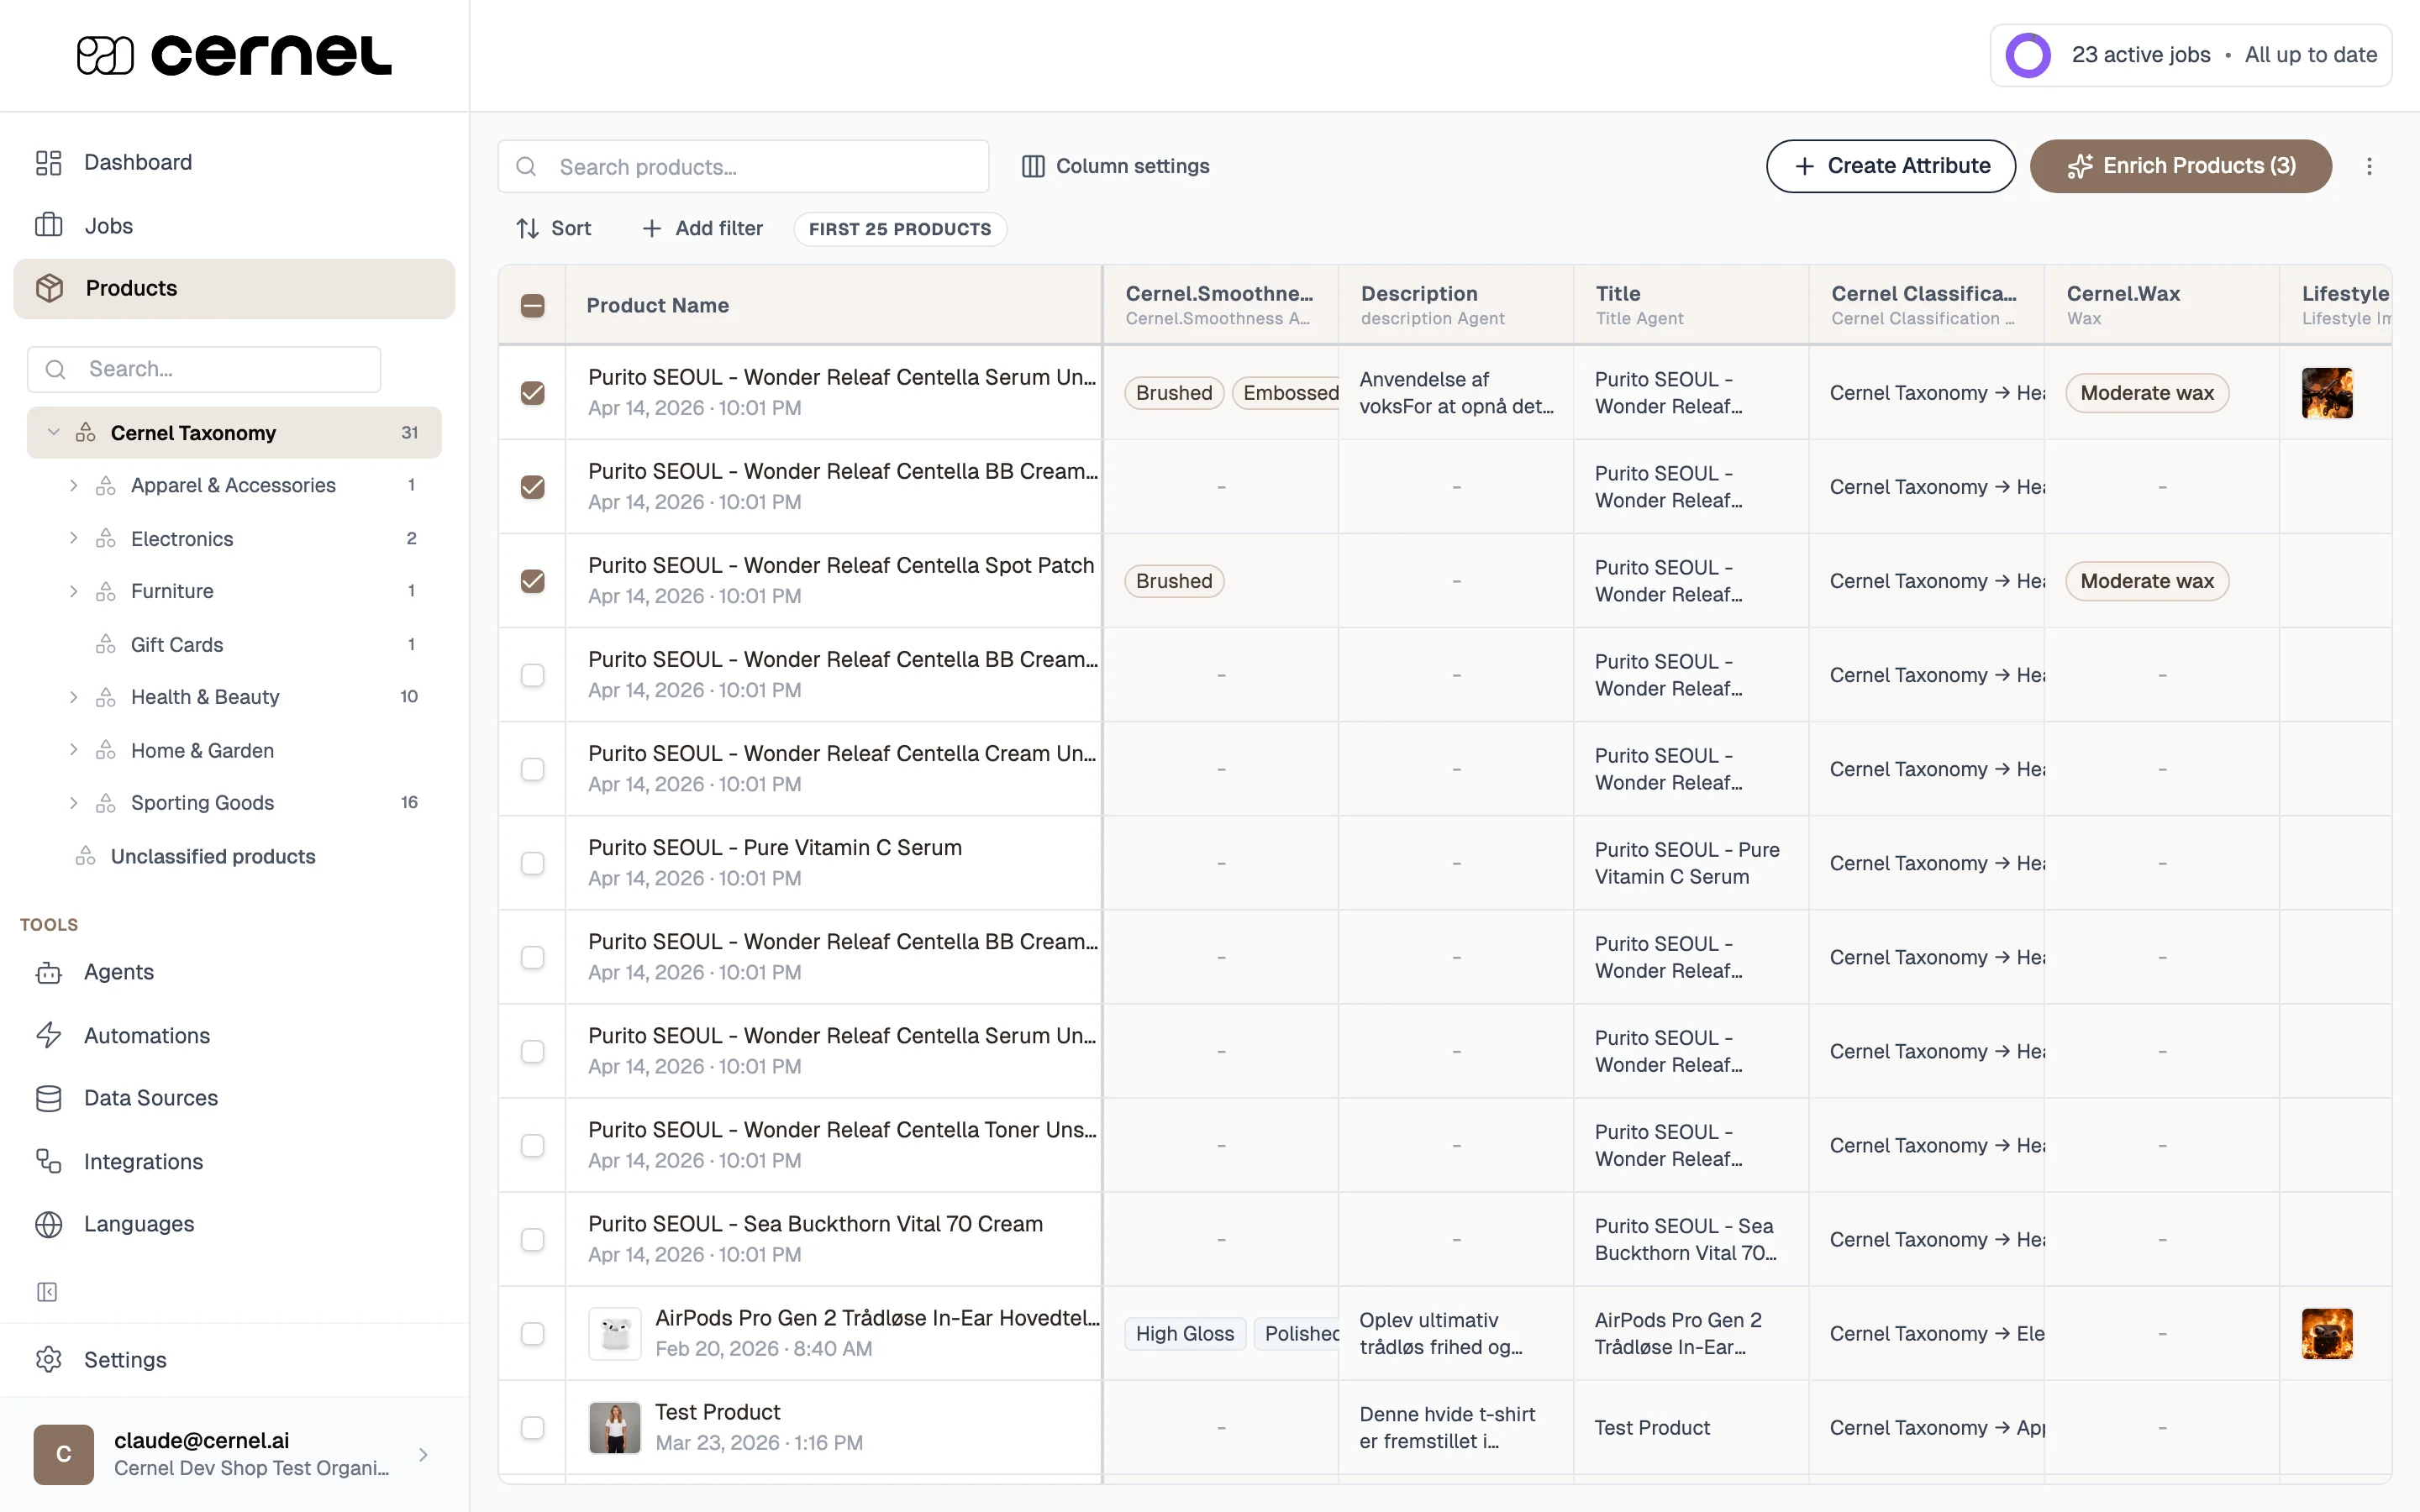
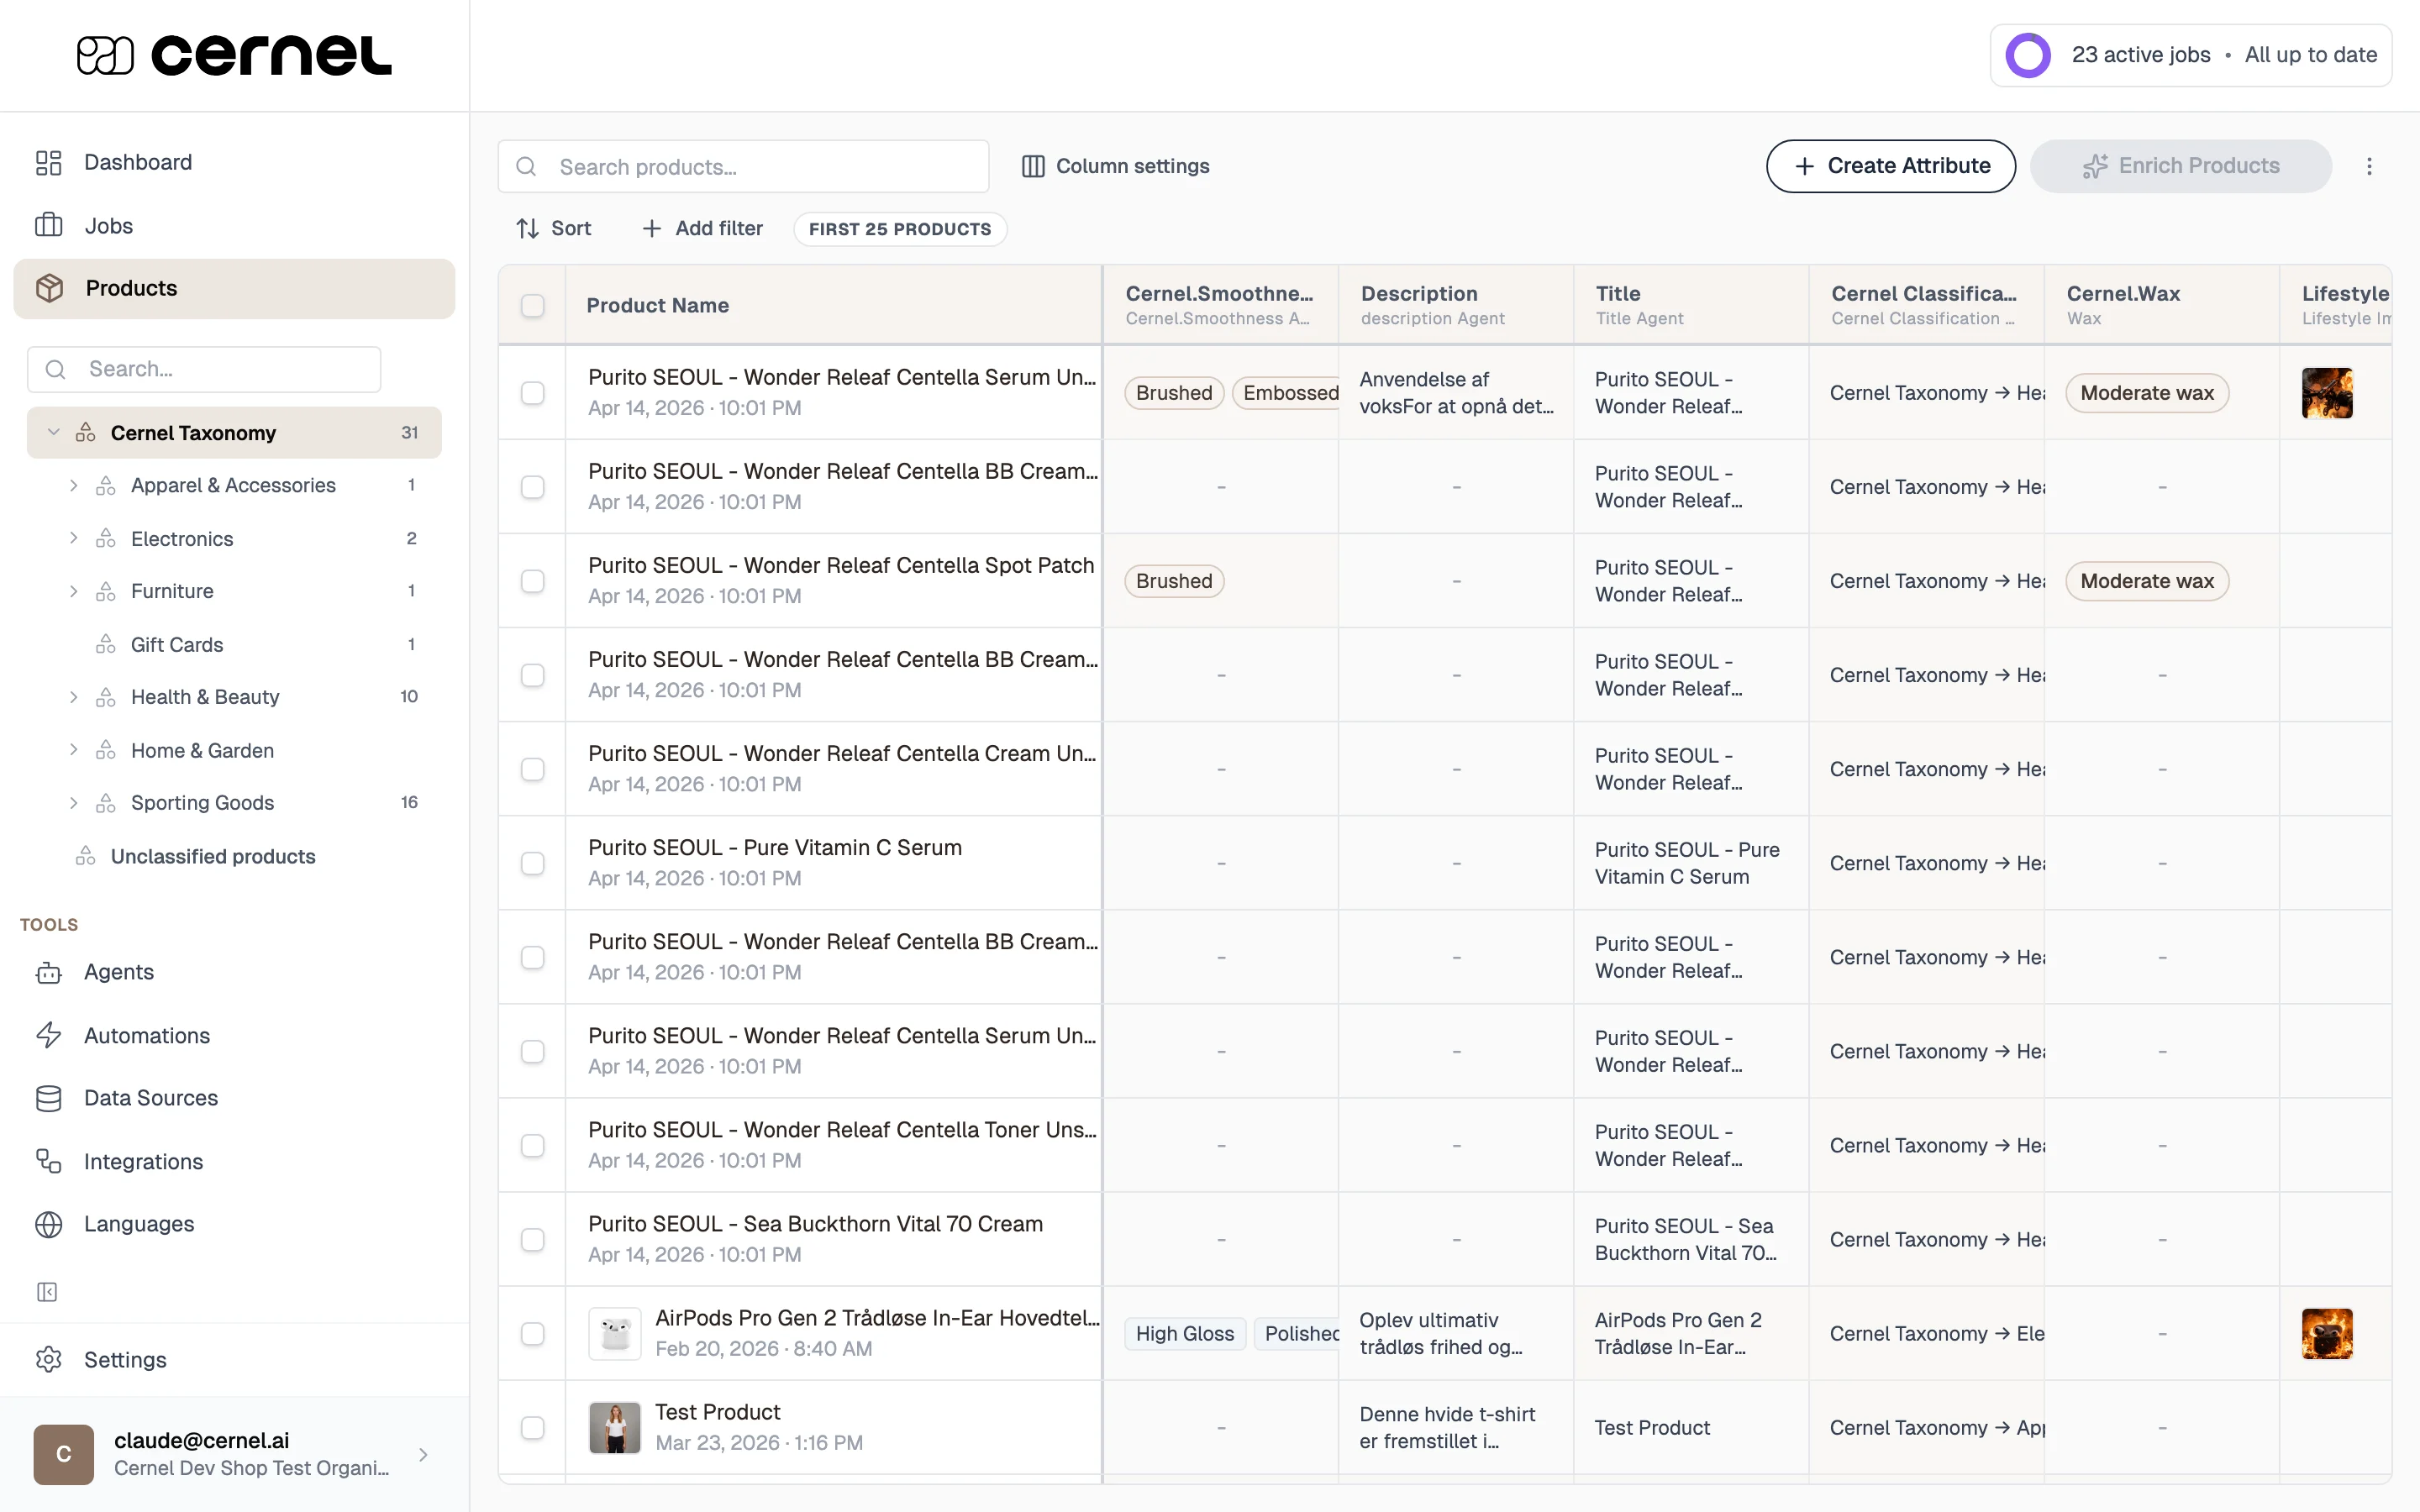 Use the checkboxes to select the products you want to enrich. You can select individual products or use the header checkbox to select all products in the current view.
 Refine your agent in the [Agent Sandbox](/features/sandbox) before running enrichment. The sandbox is the right place to test prompt wording and iterate on output quality. Enrichment is for applying an agent you're already happy with. Once the sandbox results look good, you can comfortably enrich any number of products, from a single category to your whole catalog.
Click **Enrich Products** in the toolbar. The enrichment modal opens, showing the available attributes and enabled languages for your workspace.
Check the attributes you want AI to generate. You can search for specific attributes using the search box. Once you've selected your attributes, click **Start Enrichment**.
A confirmation notification appears: "Enrichment job started for X products with Y attributes."
Go to the **Dashboard** (click the Cernel logo or the Dashboard link in the sidebar). Your enrichment job appears as a card showing:
* The job name and type (e.g., "Product Enrichment | 8 products")
* A progress indicator showing how many products have been processed
* The status: **Pending**, **Running**, or **Completed**
* Product thumbnails and attribute badges
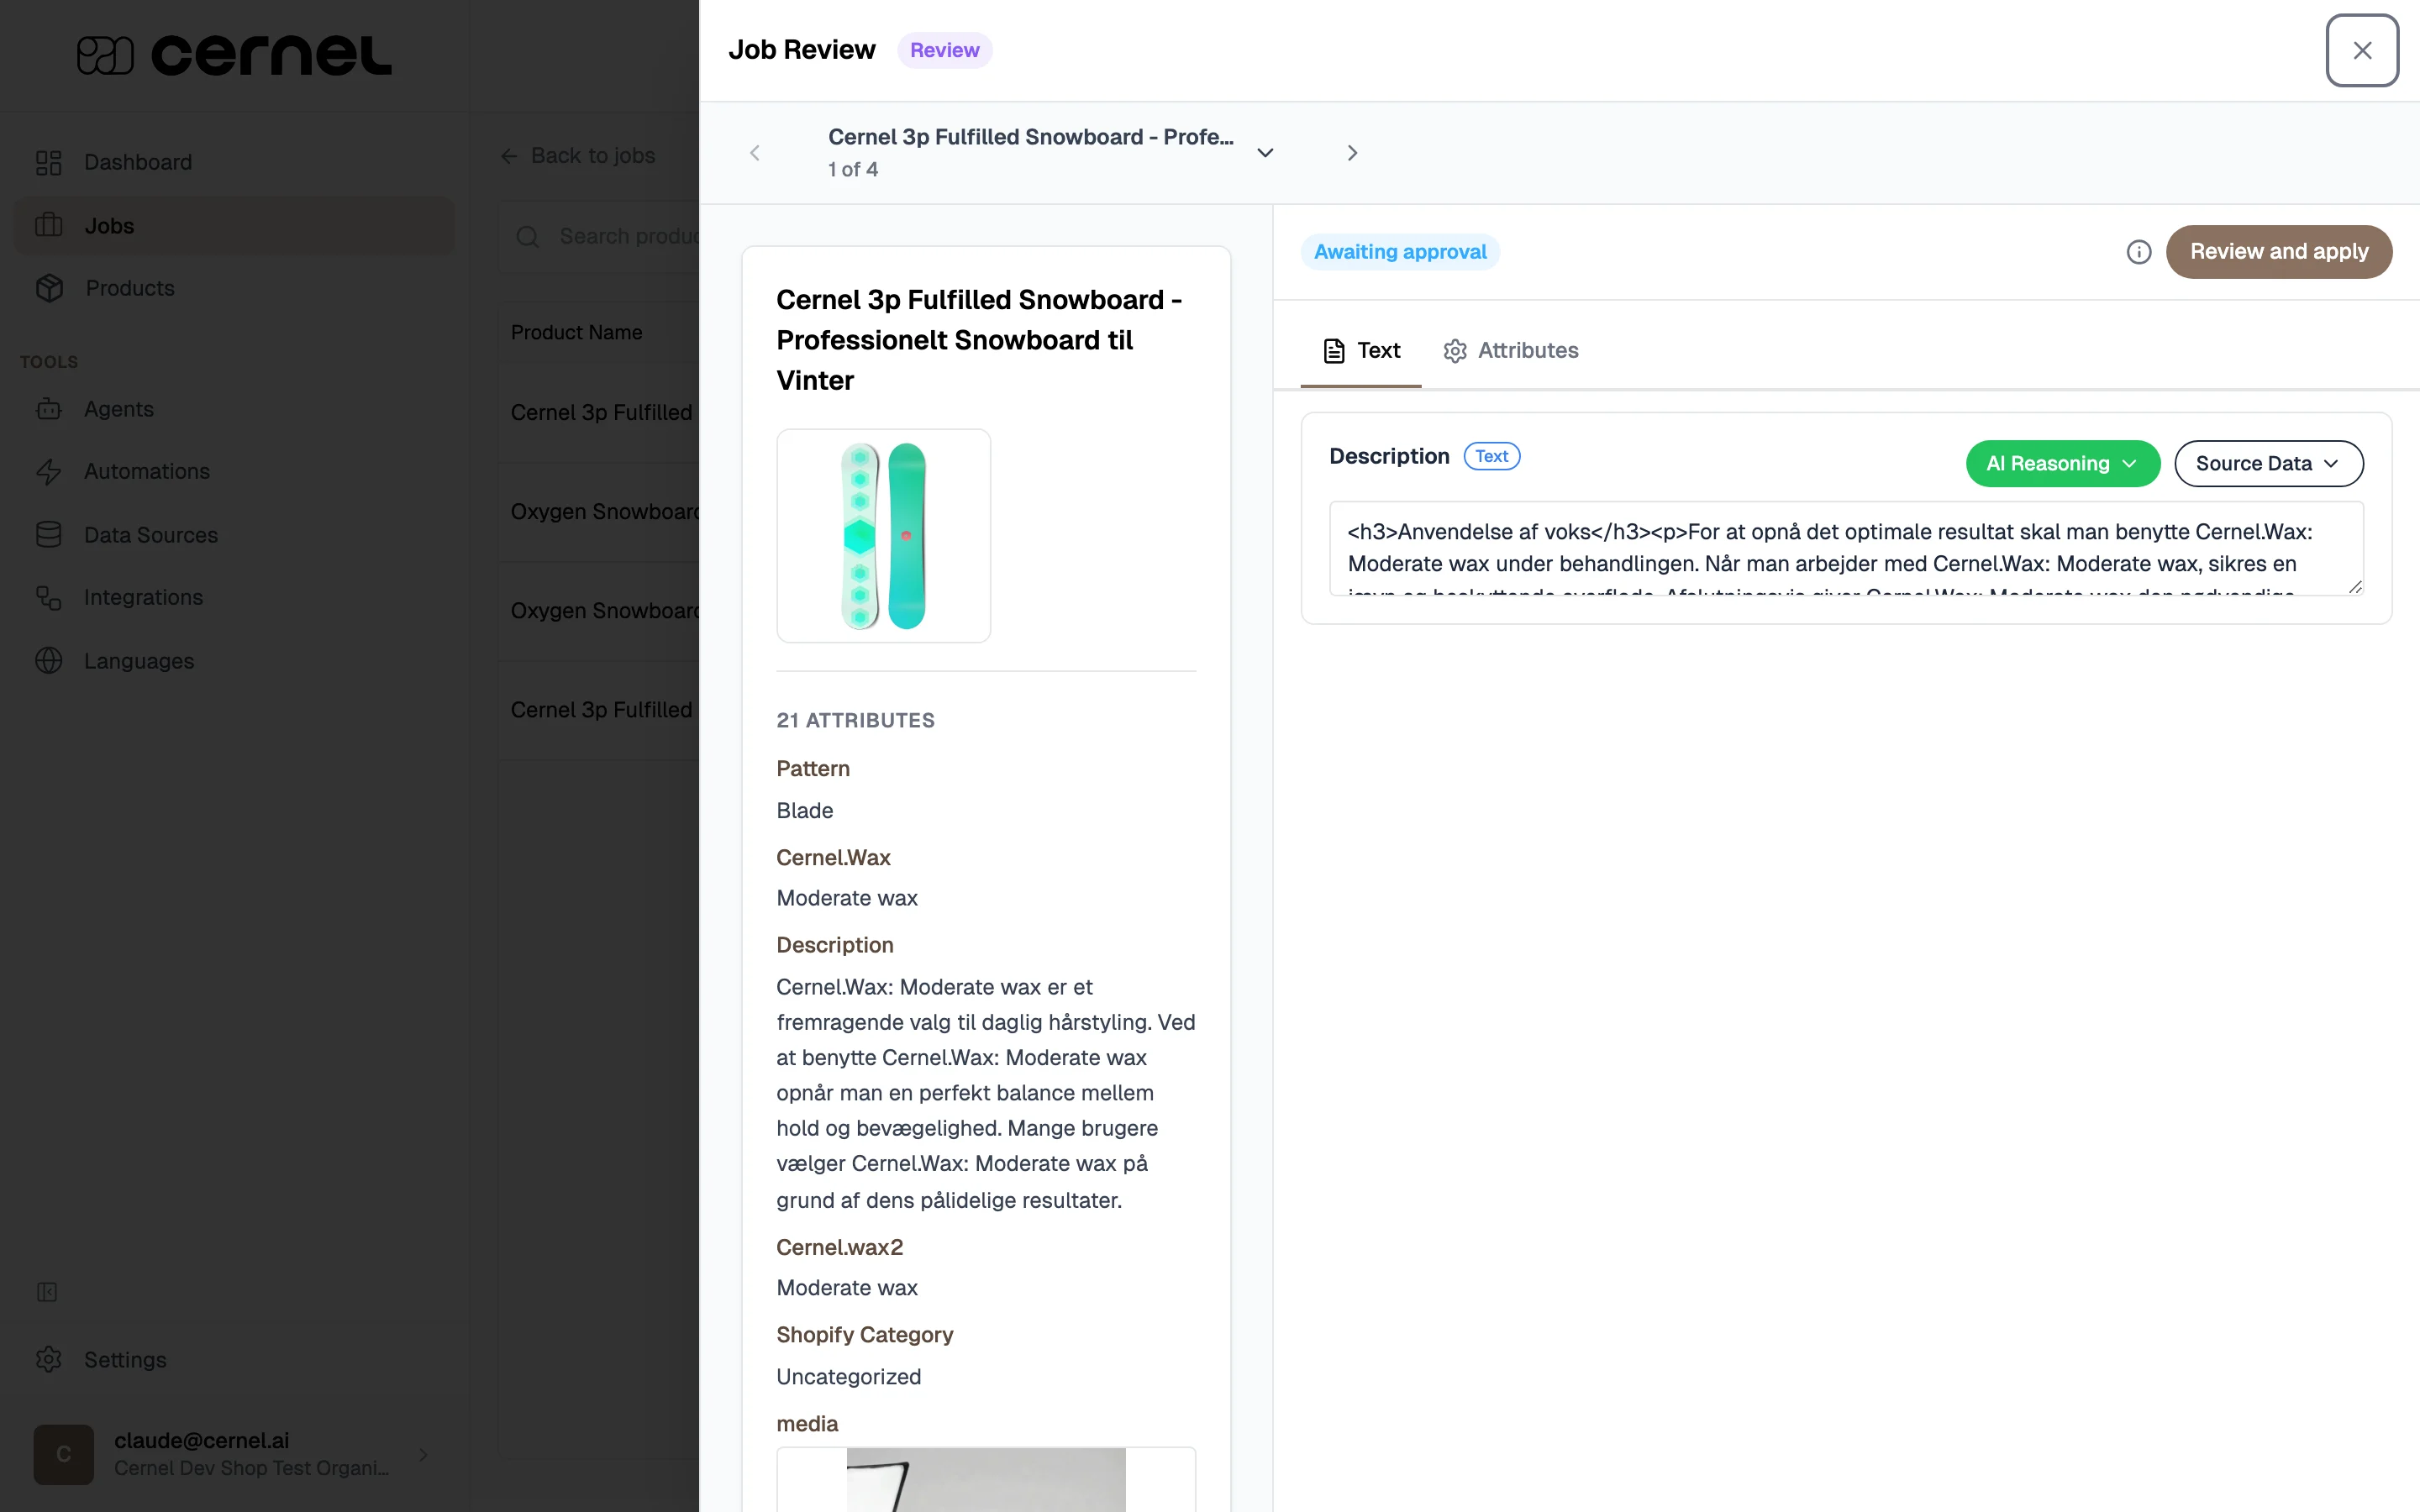
Once the job completes, click on the job card to open the review view. You'll see each product with its AI-generated values displayed alongside the original data.
For each attribute value, you can:
* **Approve**: accept the generated content as-is
* **Edit**: make changes before approving
* **Reject**: discard the generated content
You can also view the **Agent Reasoning** to understand why the AI generated specific content.
Refine your agent in the [Agent Sandbox](/features/sandbox) before running enrichment. The sandbox is the right place to test prompt wording and iterate on output quality. Enrichment is for applying an agent you're already happy with. Once the sandbox results look good, you can comfortably enrich any number of products, from a single category to your whole catalog.
Click **Enrich Products** in the toolbar. The enrichment modal opens, showing the available attributes and enabled languages for your workspace.
Check the attributes you want AI to generate. You can search for specific attributes using the search box. Once you've selected your attributes, click **Start Enrichment**.
A confirmation notification appears: "Enrichment job started for X products with Y attributes."
Go to the **Dashboard** (click the Cernel logo or the Dashboard link in the sidebar). Your enrichment job appears as a card showing:
* The job name and type (e.g., "Product Enrichment | 8 products")
* A progress indicator showing how many products have been processed
* The status: **Pending**, **Running**, or **Completed**
* Product thumbnails and attribute badges
Once the job completes, click on the job card to open the review view. You'll see each product with its AI-generated values displayed alongside the original data.
For each attribute value, you can:
* **Approve**: accept the generated content as-is
* **Edit**: make changes before approving
* **Reject**: discard the generated content
You can also view the **Agent Reasoning** to understand why the AI generated specific content.
 If the generated content doesn't match your expectations, open the agent and iterate in the [Agent Sandbox](/features/sandbox); that's where refinement belongs. Use the agent chat to rewrite the prompt, compare versions with undo/redo, and re-test on real products until the output is right. Only once the sandbox looks good should you re-run enrichment on your catalog.
You've completed your first enrichment. Approved content is ready to sync to your connected integrations. If you have **Approve Before Push** enabled in **Settings > Platform**, you'll need to approve each item before it pushes to your store.
## Frequently asked questions
Enrichment runs in the background, so you can keep working while it processes. Most products finish in under a minute. Text attributes are the quickest, while attributes that generate images or pull in external data can take a few minutes per product.
Adding more attributes to an enrichment does not make it slower. Cernel works on all selected attributes for a product at the same time, so the total wait is only as long as the slowest one.
Small batches typically complete in seconds. Larger runs across hundreds of products may take several minutes. If you have multiple enrichment jobs running at once, they may take a little longer as Cernel shares capacity fairly across your workspace. You can track progress from the Dashboard at any time.
Once an enrichment job has started, it runs to completion. If you realize the results aren't what you expected, you can reject the generated values and re-run enrichment after adjusting your agent prompts.
When enabled in **Settings > Platform**, this setting requires you to explicitly approve every generated value before it syncs to your connected integrations. This gives you full control over what gets published. Without it, approved values sync automatically.
Only attributes with a linked AI agent appear in the enrichment modal. If an attribute is missing, go to the category's attribute configuration and link an agent to it. See [AI Agents](/features/ai-agents) for how to create and link agents.
## What's next
Refine your agent prompts and create new agents for different content types.
Configure more attribute types and understand how they work across your taxonomy.
If the generated content doesn't match your expectations, open the agent and iterate in the [Agent Sandbox](/features/sandbox); that's where refinement belongs. Use the agent chat to rewrite the prompt, compare versions with undo/redo, and re-test on real products until the output is right. Only once the sandbox looks good should you re-run enrichment on your catalog.
You've completed your first enrichment. Approved content is ready to sync to your connected integrations. If you have **Approve Before Push** enabled in **Settings > Platform**, you'll need to approve each item before it pushes to your store.
## Frequently asked questions
Enrichment runs in the background, so you can keep working while it processes. Most products finish in under a minute. Text attributes are the quickest, while attributes that generate images or pull in external data can take a few minutes per product.
Adding more attributes to an enrichment does not make it slower. Cernel works on all selected attributes for a product at the same time, so the total wait is only as long as the slowest one.
Small batches typically complete in seconds. Larger runs across hundreds of products may take several minutes. If you have multiple enrichment jobs running at once, they may take a little longer as Cernel shares capacity fairly across your workspace. You can track progress from the Dashboard at any time.
Once an enrichment job has started, it runs to completion. If you realize the results aren't what you expected, you can reject the generated values and re-run enrichment after adjusting your agent prompts.
When enabled in **Settings > Platform**, this setting requires you to explicitly approve every generated value before it syncs to your connected integrations. This gives you full control over what gets published. Without it, approved values sync automatically.
Only attributes with a linked AI agent appear in the enrichment modal. If an attribute is missing, go to the category's attribute configuration and link an agent to it. See [AI Agents](/features/ai-agents) for how to create and link agents.
## What's next
Refine your agent prompts and create new agents for different content types.
Configure more attribute types and understand how they work across your taxonomy.