> ## Documentation Index
> Fetch the complete documentation index at: https://docs.cernel.com/llms.txt
> Use this file to discover all available pages before exploring further.
# CSV Import & Export
> Import product data from CSV files and export your enriched catalog using reusable templates.
CSV import and export let you bring product data into Cernel from a spreadsheet and send your enriched catalog back out as a CSV file. Map your columns once, see exactly what an import will change before it runs, and save reusable export layouts you can run on demand. It's the fastest way to work with product data that lives in a spreadsheet, a vendor file, or any system that reads and writes CSV.
## How it works
CSV import and export have their own home in the platform. In the sidebar, open **CSV** under **Tools**. The page has two tabs:
* **CSV Import**: bring product data into Cernel from a file. Cernel reads your file, suggests how each column maps to your attributes and product identifiers, and shows you a preview of what will be created or updated before anything happens.
* **CSV Export Templates**: reusable column layouts for exporting product data. You define a template once, then run exports from the Products page whenever you need a file.
When you start an import, Cernel first asks where your file is coming from. This sets the right expectations for how the file is matched to your catalog:
**Key concept: catalog vs. vendor imports.**
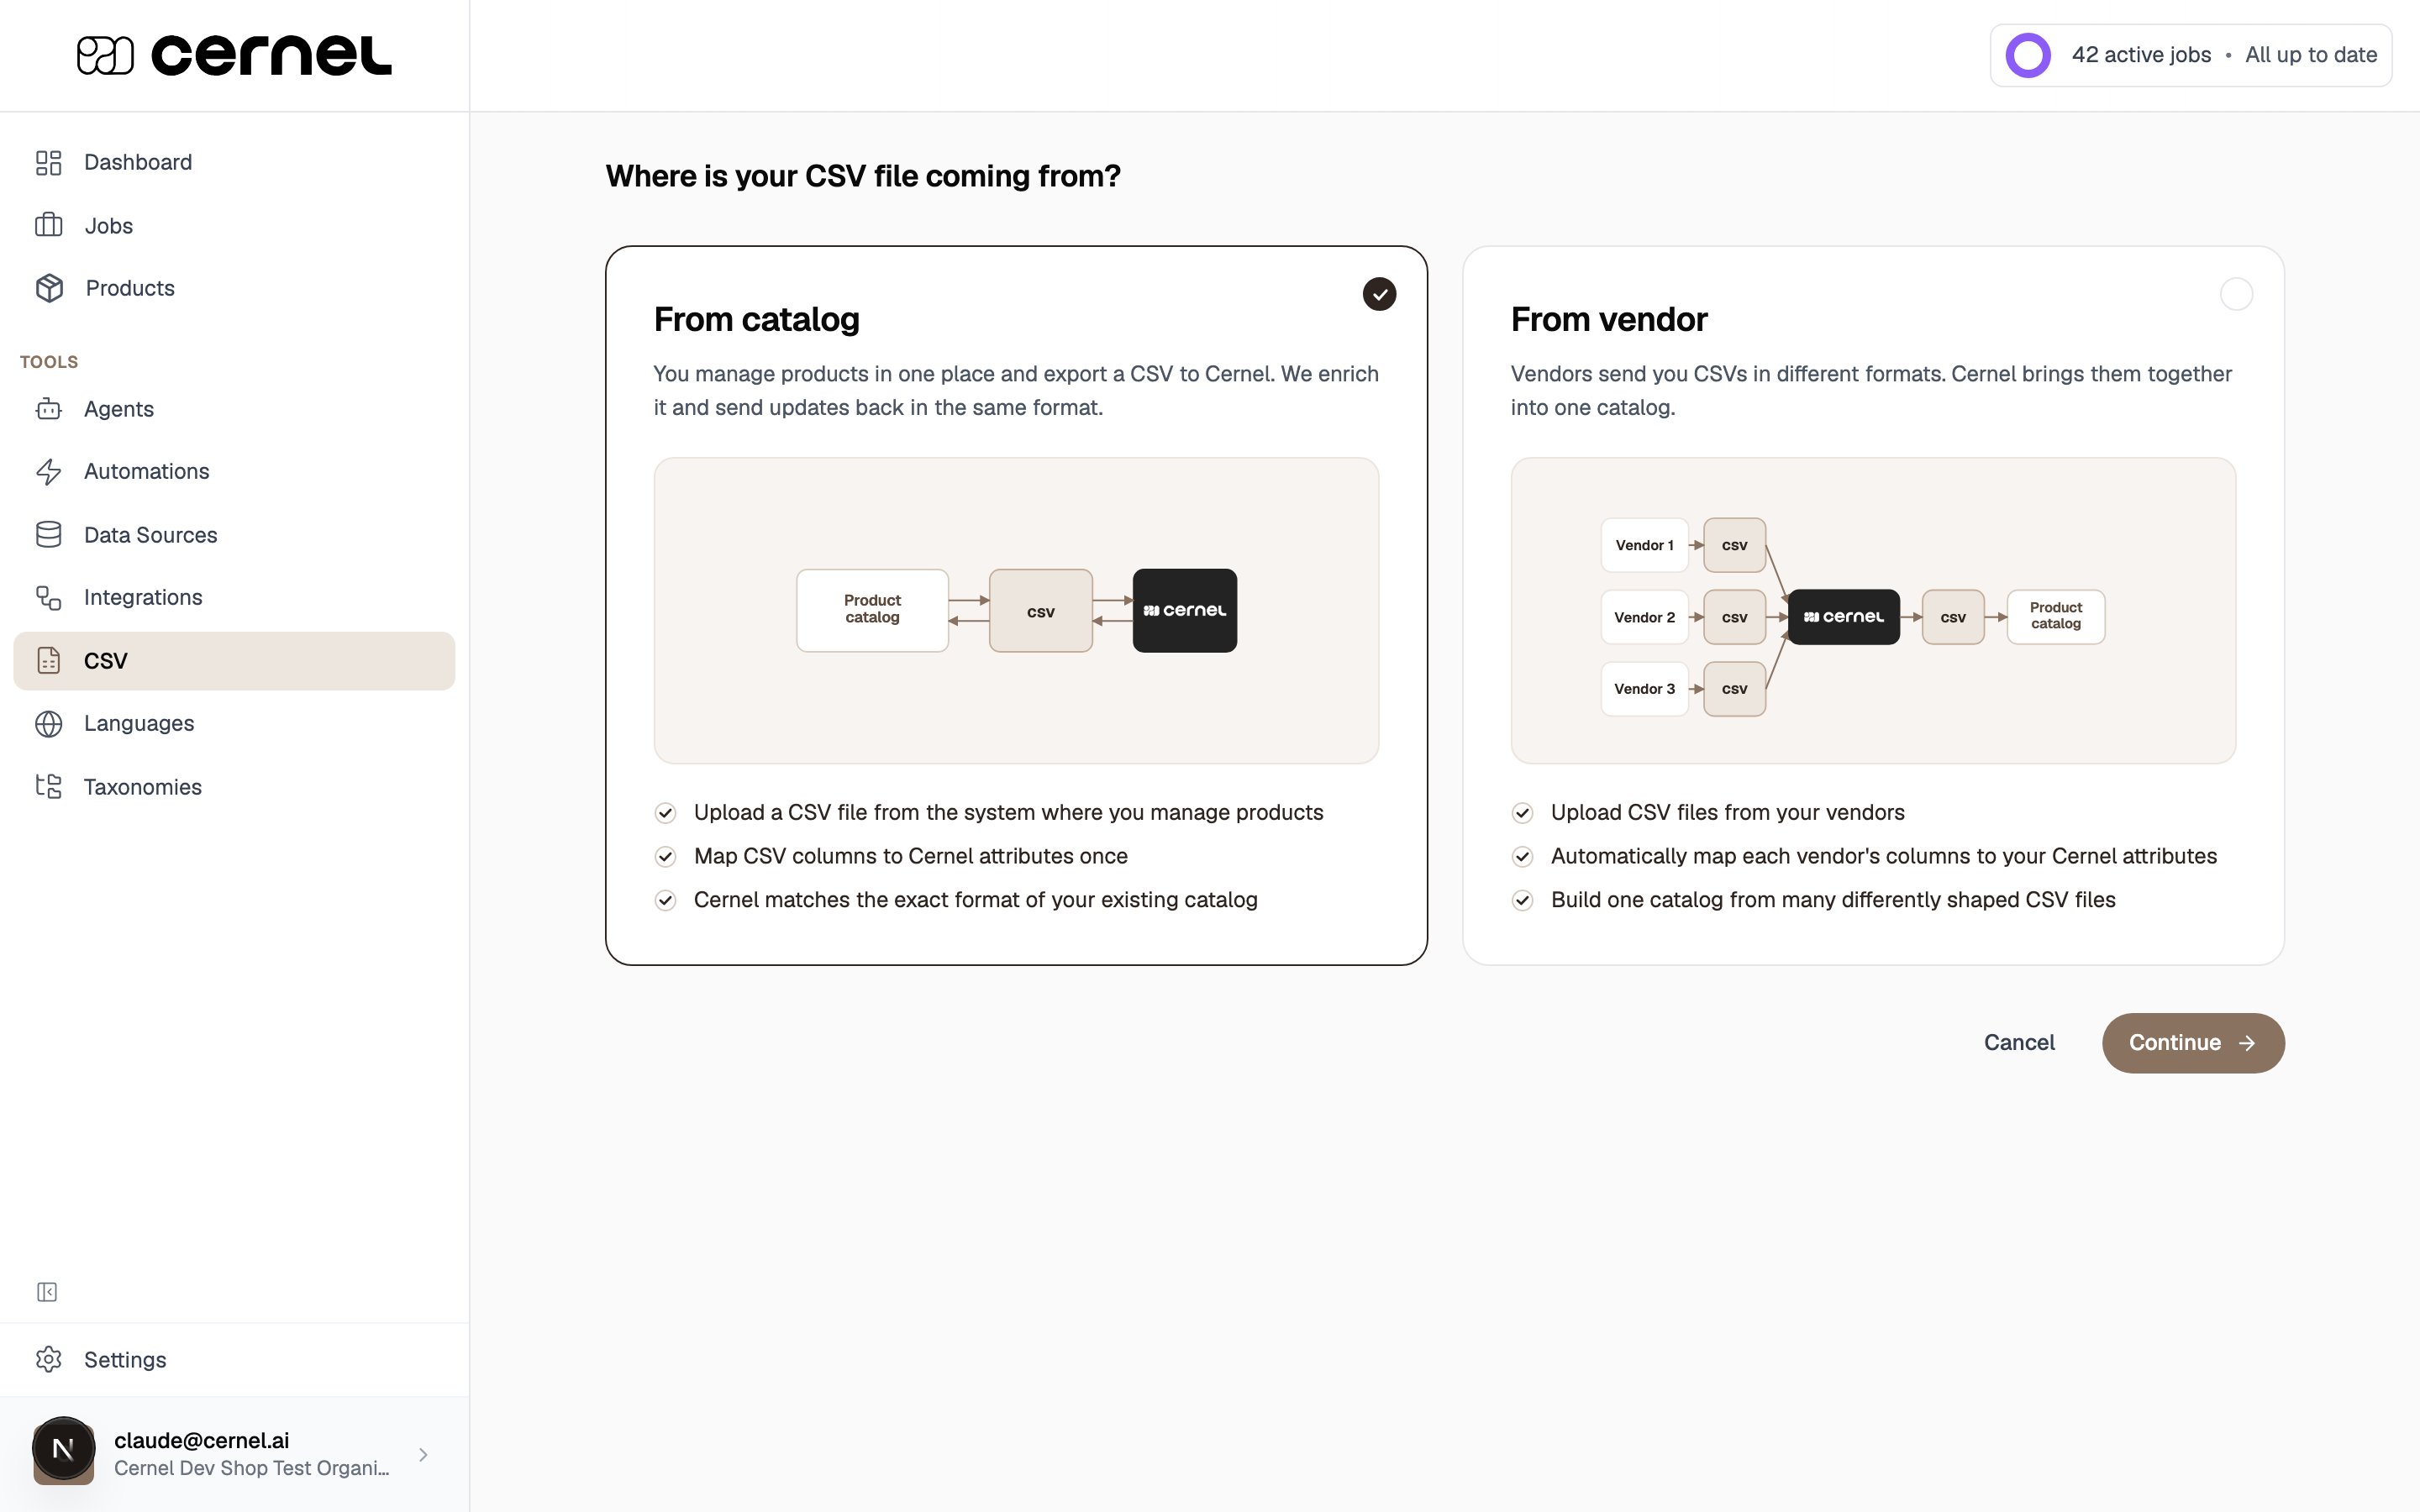
* **From catalog**: you manage products in one system and send a CSV to Cernel. Cernel enriches it and you get updates back in the same format. The file keeps the same column layout each time, so you map it once.
* **From vendor**: different suppliers send you files in different shapes. Cernel maps each vendor's columns to your attributes and brings them together into one catalog.
### Why you would use this
If your product data lives in a spreadsheet (from a supplier, an ERP system, or a manual catalog), you can import it directly without building a custom integration.
Define the columns and headers your downstream system expects once as a template, then run the same export again in two clicks whenever your data changes.
## Importing products from a CSV
Prefer to watch first? These short walkthroughs cover each import type, then the written steps follow below.
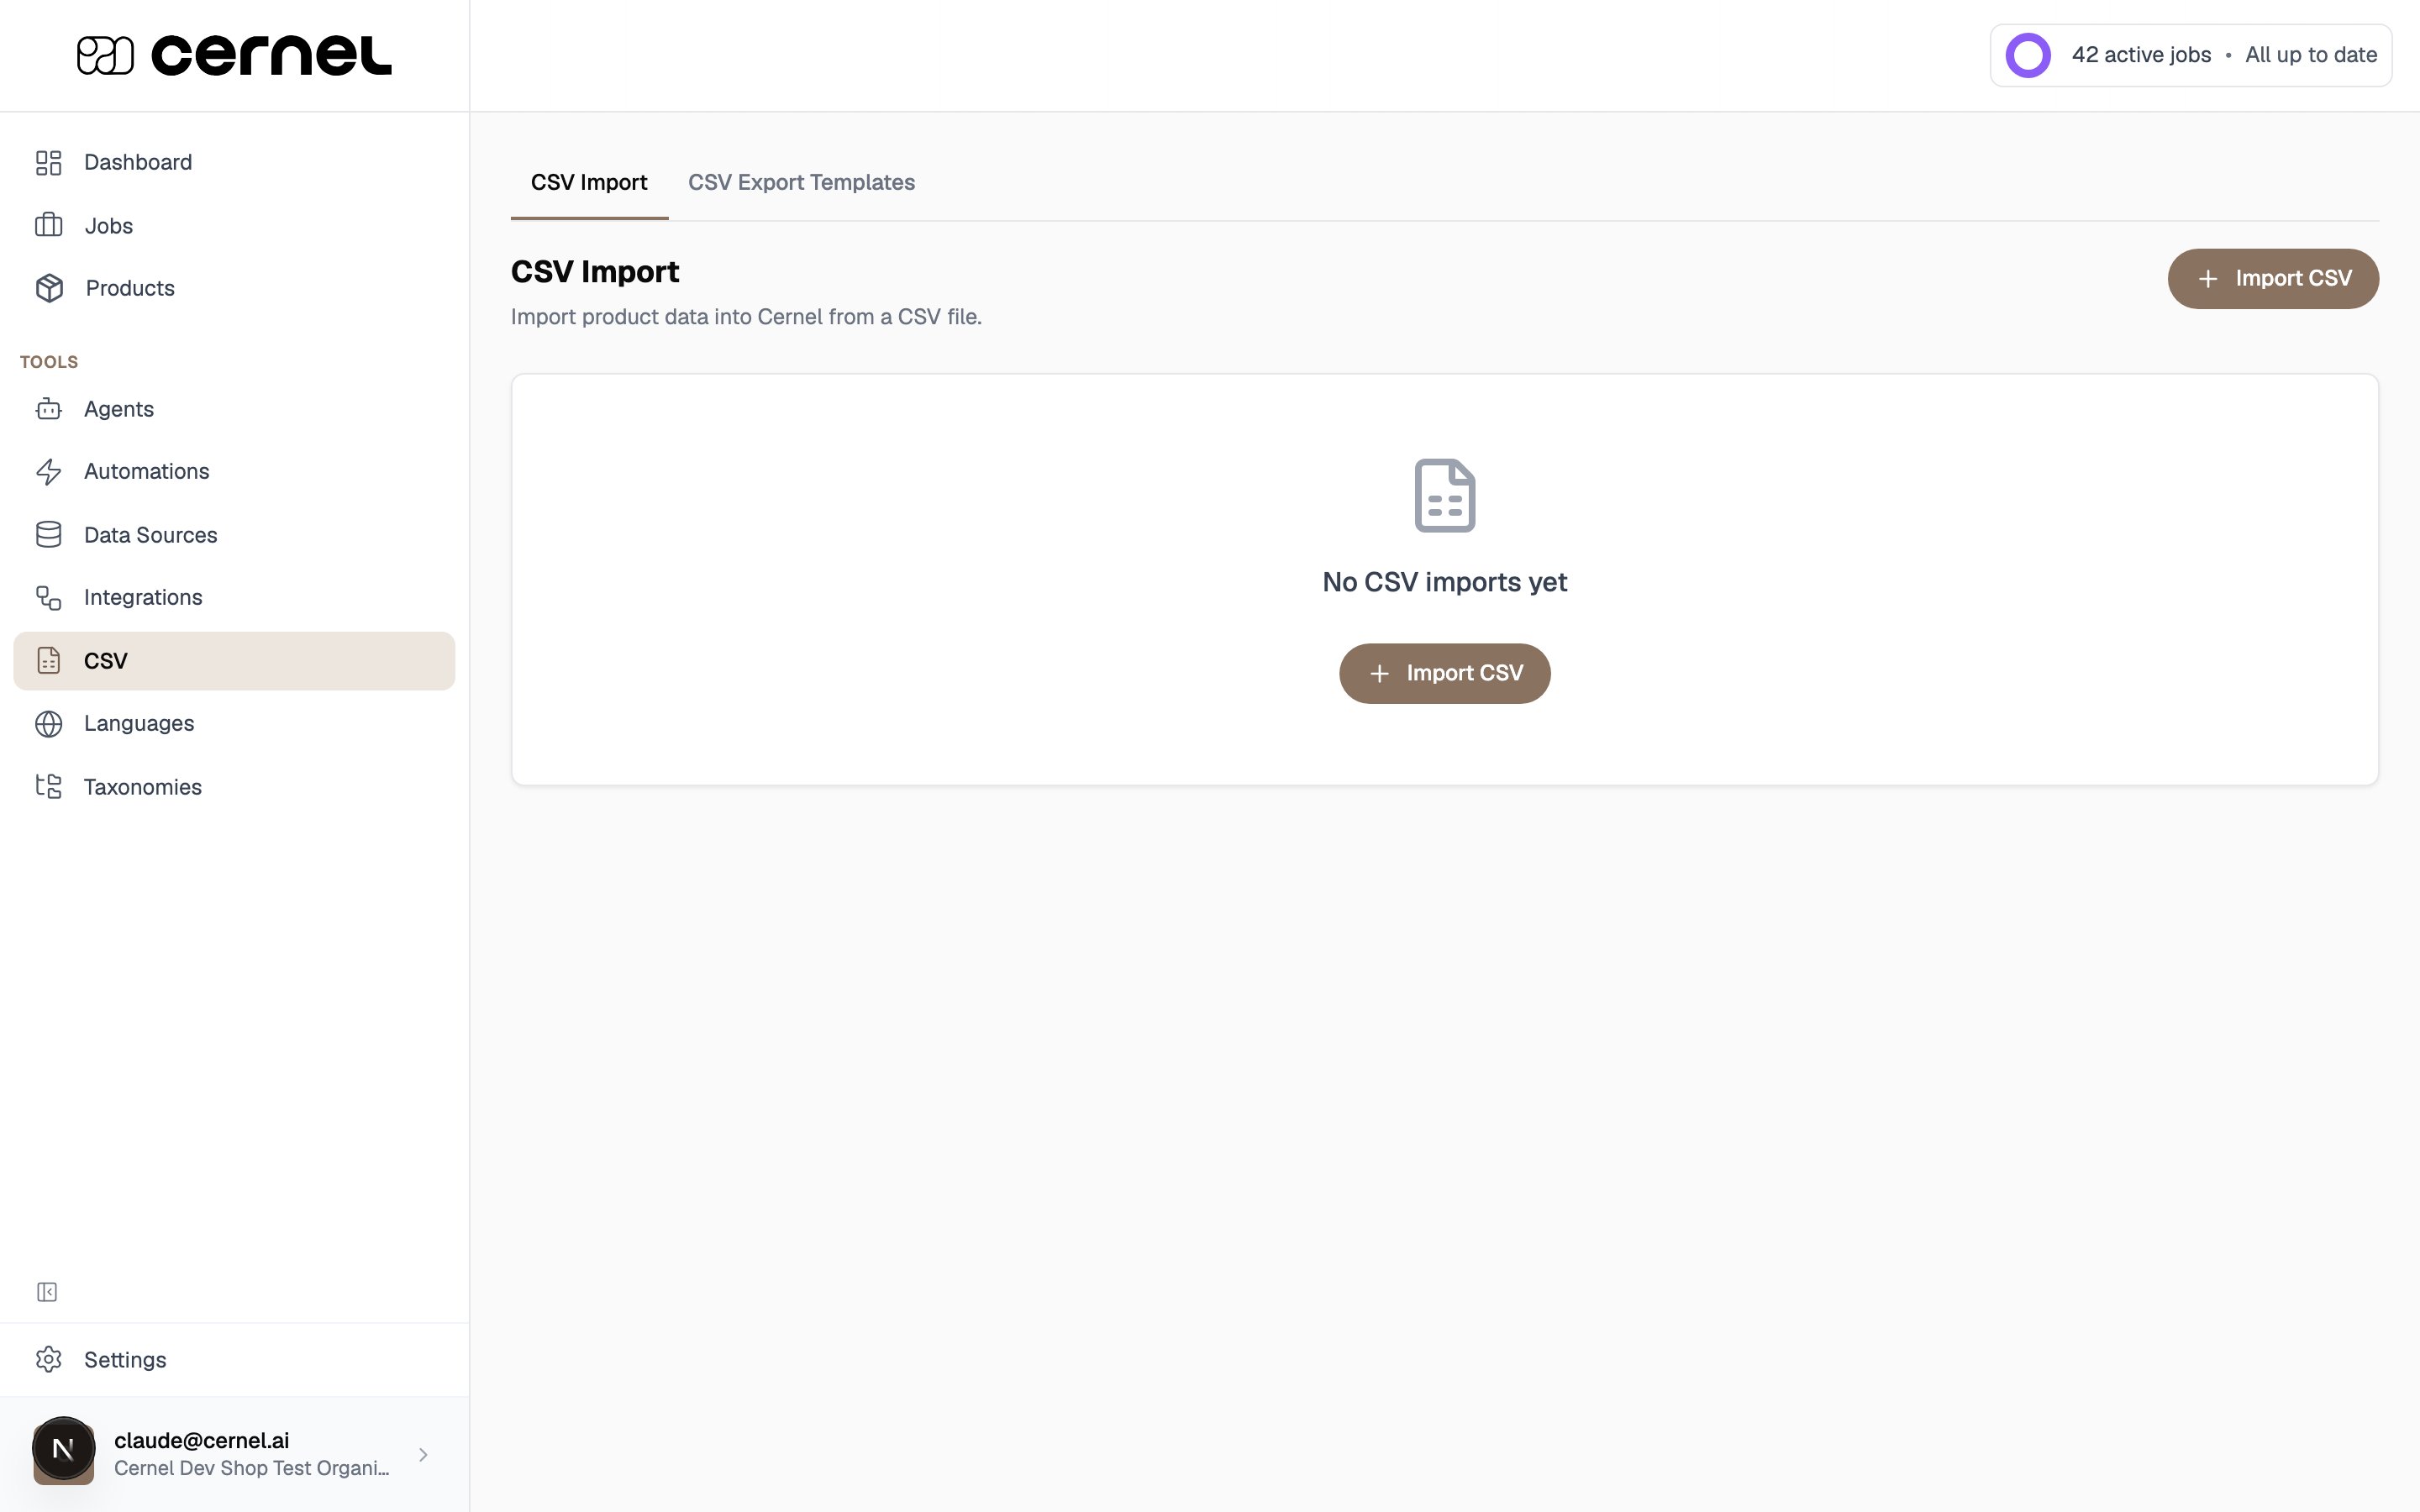
In the sidebar, open **CSV** under **Tools**. On the **CSV Import** tab, click **Import CSV**.
 Cernel asks **Where is your CSV file coming from?** Pick the option that matches your workflow and click **Continue**:
* **From catalog**: you manage products in one place and round-trip a CSV through Cernel.
* **From vendor**: you receive differently-shaped files from multiple suppliers and want them combined into one catalog.
Cernel asks **Where is your CSV file coming from?** Pick the option that matches your workflow and click **Continue**:
* **From catalog**: you manage products in one place and round-trip a CSV through Cernel.
* **From vendor**: you receive differently-shaped files from multiple suppliers and want them combined into one catalog.
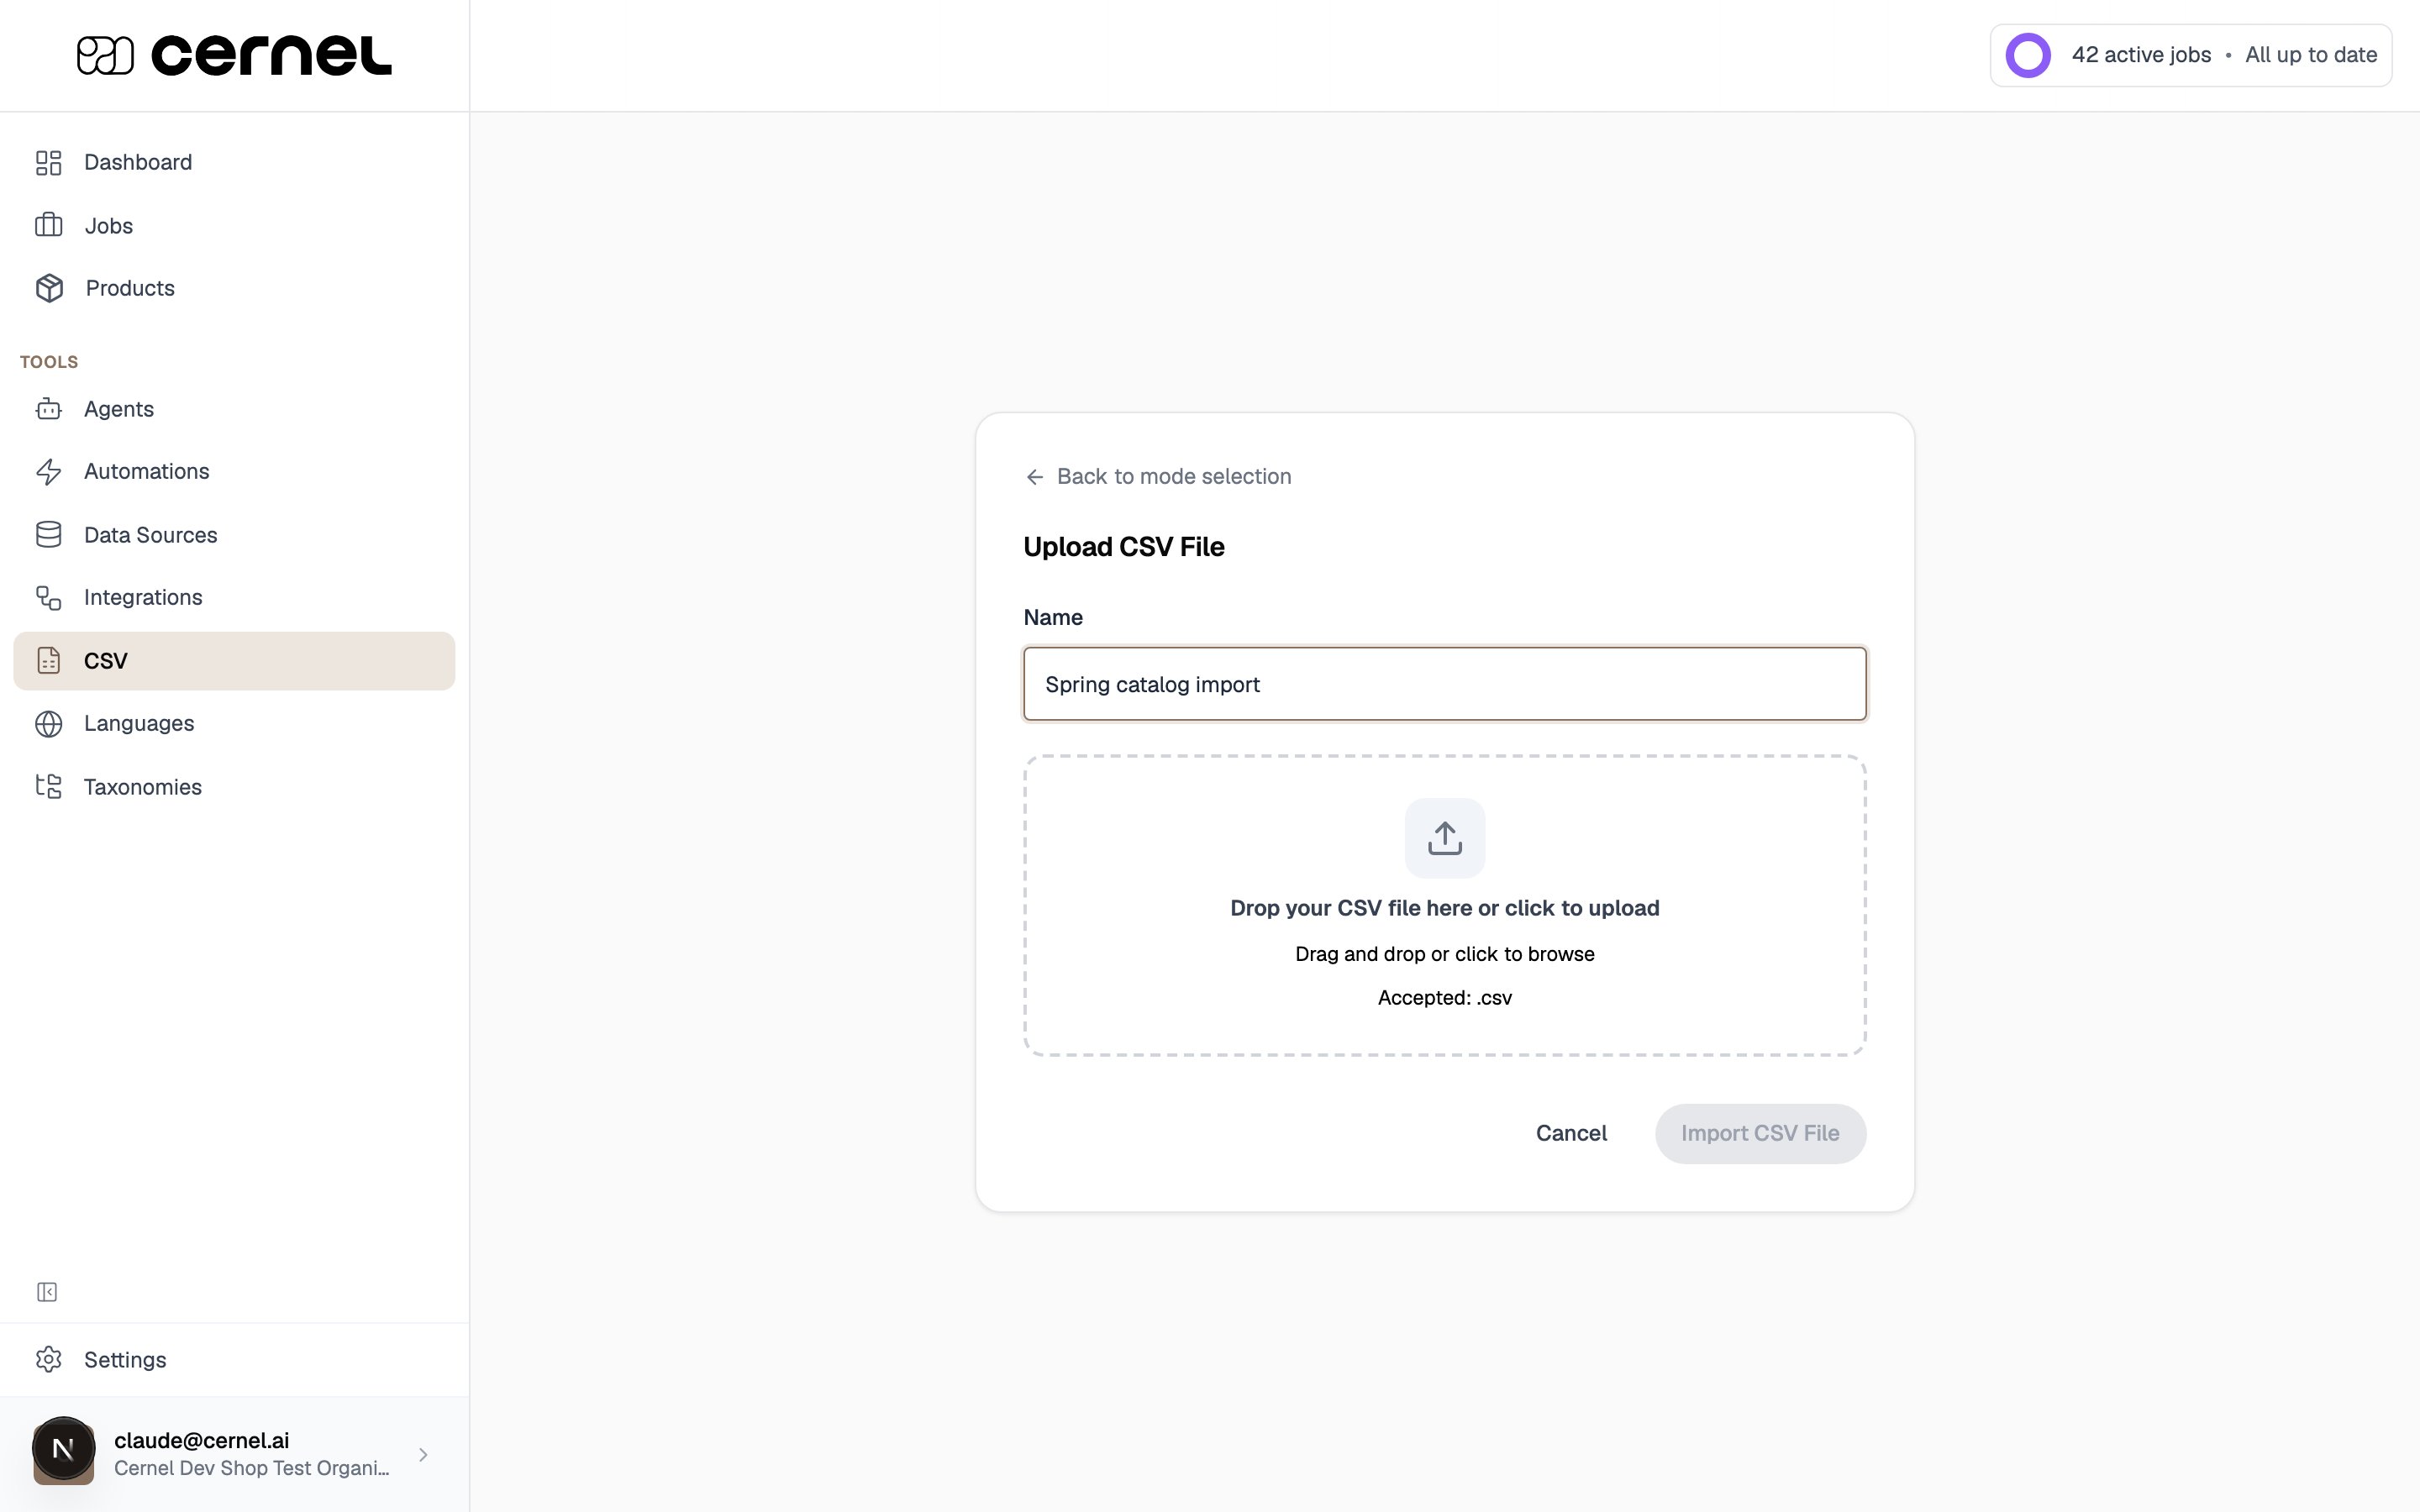
 Give the import a name so you can recognize it later, then drop your `.csv` file onto the upload area (or click to browse). Click **Import CSV File** to analyze it.
 If Cernel can't detect how your file separates columns, it asks you to pick the delimiter: comma, semicolon, tab, or pipe. This is common with European exports that use semicolons.
Cernel analyzes your file and proposes a mapping for each column. Review the suggestions and adjust as needed:
* Map each column to an existing **attribute** or a **product identifier** (such as SKU or GTIN), or create a new one inline.
* Columns Cernel couldn't place are listed as **skipped**: add the ones you want with **Add to imported columns**.
* Where Cernel recommends a new attribute, accept it with one click.
Map at least one **product identifier** and a column to use as the **product title**: these are required to run the import. The identifier is how Cernel matches rows to existing products on every future import, so values must be stable and unique.
Pick a sync mode before you run:
* **Full Sync**: existing products are updated and new rows are created.
* **Update Only**: only existing products are updated; rows without a matching identifier are skipped, so nothing new is created.
When you're happy with the mapping, click **Save and review import**.
Cernel scans your file and shows a preview of exactly what will happen: how many products will be **created**, how many **updated**, and any new attributes or identifiers that will be created. When it looks right, click **Run import**.
Your import is running. Products appear in your catalog and are ready for enrichment as the import completes.
## Exporting your catalog as a CSV
Exporting works in two parts: you create a reusable **export template** that defines the columns and layout, then you run an export from the **Products** page using that template. You can also pick columns ad hoc at export time without a template.
### Create an export template
Open **CSV** under **Tools**, switch to the **CSV Export Templates** tab, and click **Create CSV Export Template**.
Set up the layout your downstream system expects:
* **Export Name**: a descriptive name for the template.
* **Quick setup (optional)**: upload a sample CSV and Cernel auto-maps columns whose names match your attributes or identifiers, so you don't have to build the layout by hand.
* **Column mapping**: choose which attributes and product identifiers to include, rename the output column headers, and drag to reorder.
If Cernel can't detect how your file separates columns, it asks you to pick the delimiter: comma, semicolon, tab, or pipe. This is common with European exports that use semicolons.
Cernel analyzes your file and proposes a mapping for each column. Review the suggestions and adjust as needed:
* Map each column to an existing **attribute** or a **product identifier** (such as SKU or GTIN), or create a new one inline.
* Columns Cernel couldn't place are listed as **skipped**: add the ones you want with **Add to imported columns**.
* Where Cernel recommends a new attribute, accept it with one click.
Map at least one **product identifier** and a column to use as the **product title**: these are required to run the import. The identifier is how Cernel matches rows to existing products on every future import, so values must be stable and unique.
Pick a sync mode before you run:
* **Full Sync**: existing products are updated and new rows are created.
* **Update Only**: only existing products are updated; rows without a matching identifier are skipped, so nothing new is created.
When you're happy with the mapping, click **Save and review import**.
Cernel scans your file and shows a preview of exactly what will happen: how many products will be **created**, how many **updated**, and any new attributes or identifiers that will be created. When it looks right, click **Run import**.
Your import is running. Products appear in your catalog and are ready for enrichment as the import completes.
## Exporting your catalog as a CSV
Exporting works in two parts: you create a reusable **export template** that defines the columns and layout, then you run an export from the **Products** page using that template. You can also pick columns ad hoc at export time without a template.
### Create an export template
Open **CSV** under **Tools**, switch to the **CSV Export Templates** tab, and click **Create CSV Export Template**.
Set up the layout your downstream system expects:
* **Export Name**: a descriptive name for the template.
* **Quick setup (optional)**: upload a sample CSV and Cernel auto-maps columns whose names match your attributes or identifiers, so you don't have to build the layout by hand.
* **Column mapping**: choose which attributes and product identifiers to include, rename the output column headers, and drag to reorder.
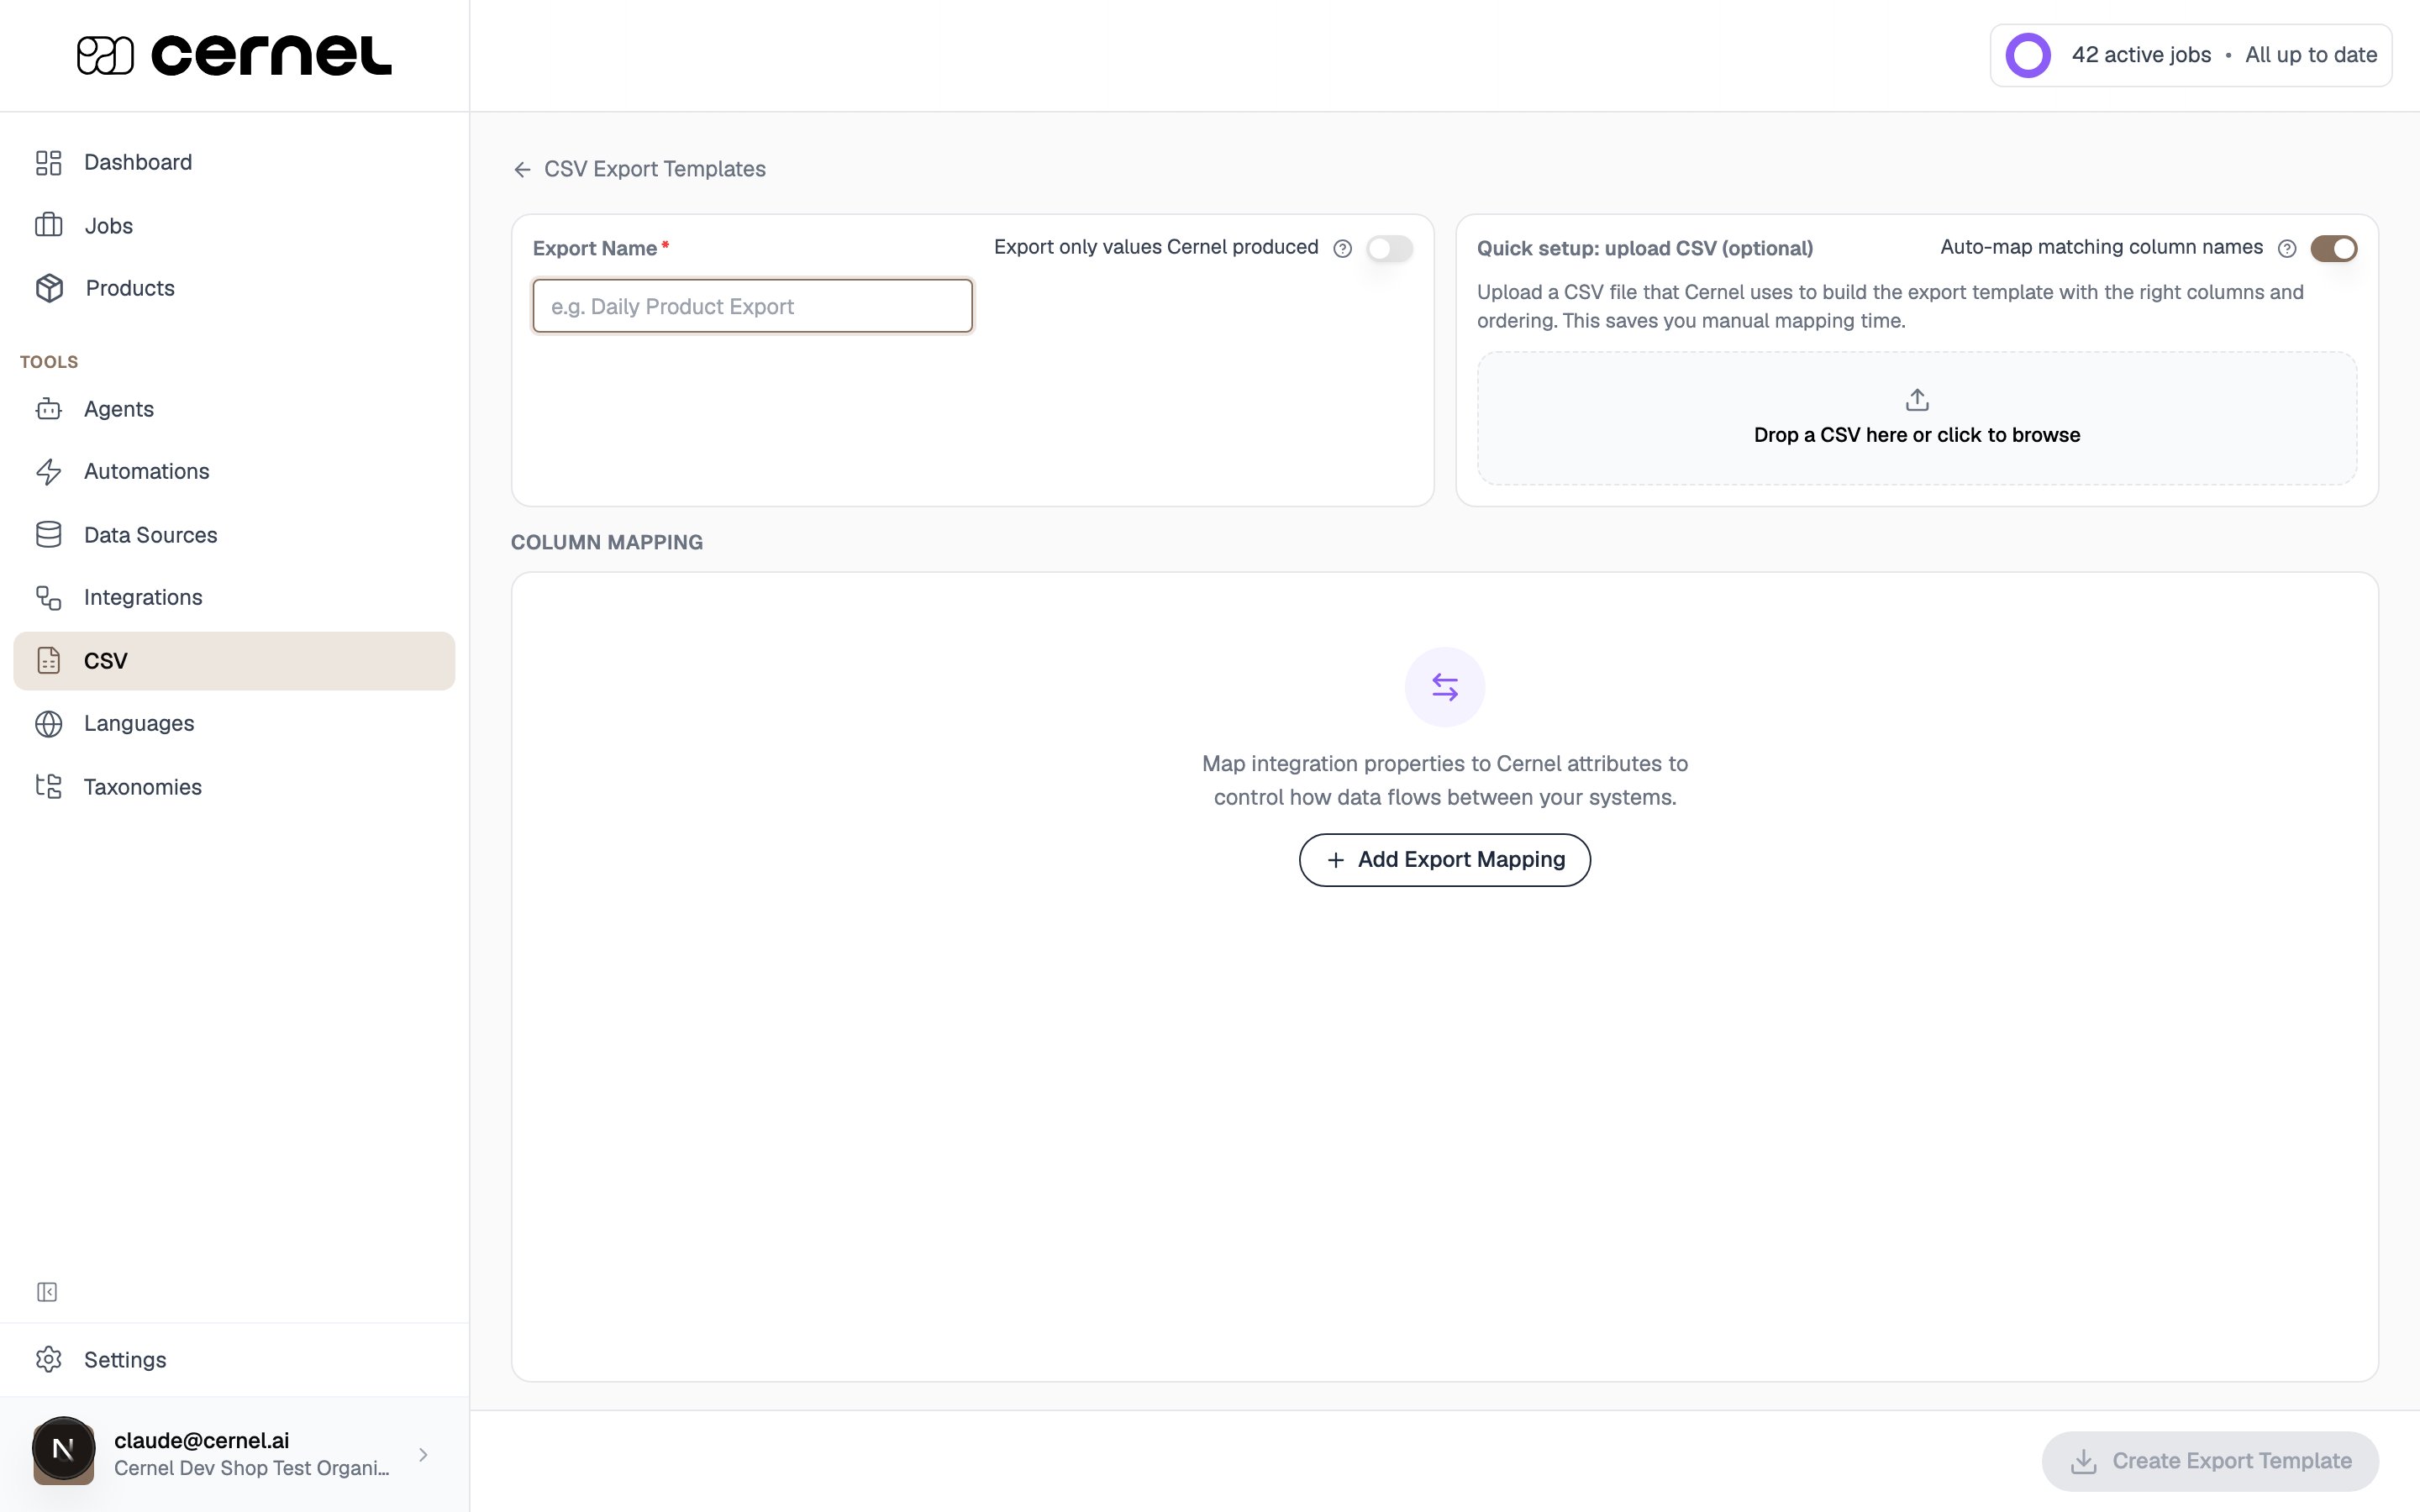 Turn on **Export only values Cernel produced** to leave imported values out of the file, so it contains only what Cernel generated or you edited. This is useful for pushing updates back to a source system without overwriting it with its own data.
Click **Create Export Template**. The template now appears on the **CSV Export Templates** tab and is available whenever you export from the Products page.
Your export template is saved and reusable. Edit it any time, or duplicate it as a starting point for a similar layout.
### Run an export from the Products page
Open a category in the **Products** sidebar. The export honors your current filters and selection: tick specific rows, or leave the selection to export everything that matches your filters.
From the products toolbar, choose **Export to CSV**. On the **Templates** tab, select one of your saved export templates to load its columns. You can still adjust the columns before exporting.
Turn on **Export only values Cernel produced** to leave imported values out of the file, so it contains only what Cernel generated or you edited. This is useful for pushing updates back to a source system without overwriting it with its own data.
Click **Create Export Template**. The template now appears on the **CSV Export Templates** tab and is available whenever you export from the Products page.
Your export template is saved and reusable. Edit it any time, or duplicate it as a starting point for a similar layout.
### Run an export from the Products page
Open a category in the **Products** sidebar. The export honors your current filters and selection: tick specific rows, or leave the selection to export everything that matches your filters.
From the products toolbar, choose **Export to CSV**. On the **Templates** tab, select one of your saved export templates to load its columns. You can still adjust the columns before exporting.
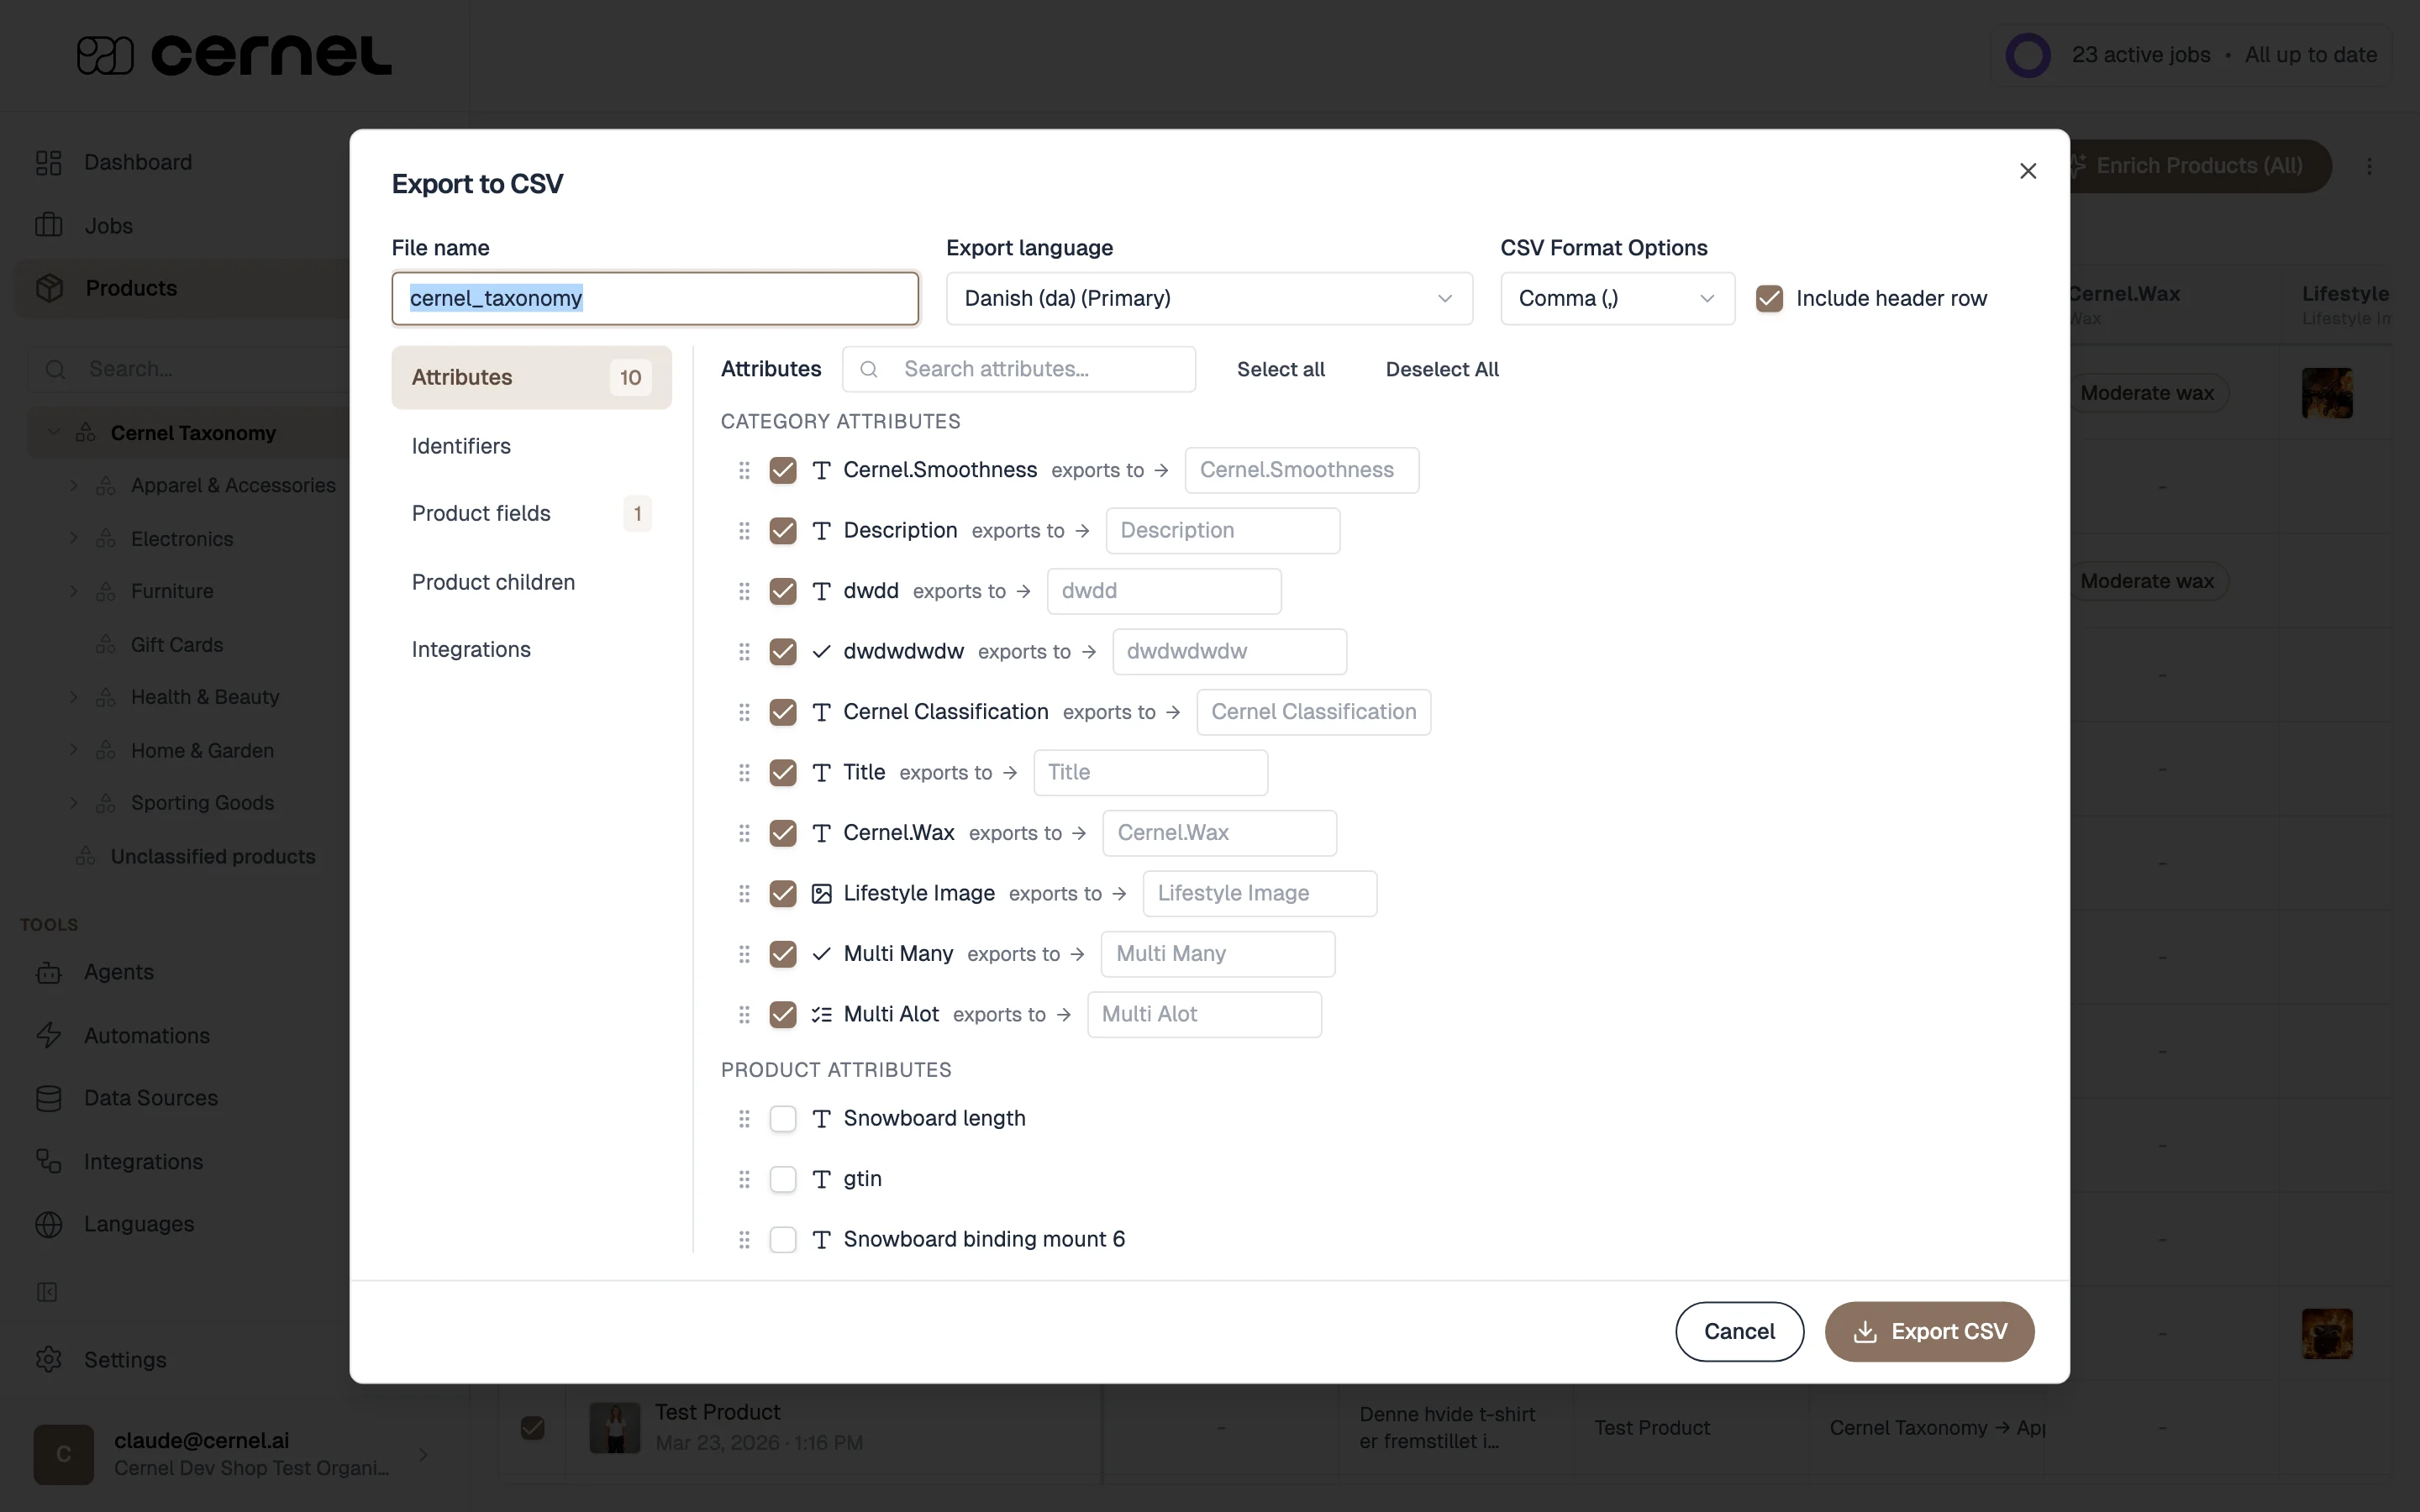 Set the file basics and download:
* **File name**: defaults to the current category; the `.csv` suffix is added automatically.
* **Export language**: pick one enabled language. The primary language is marked **(Primary)**.
* **Delimiter** and **Include header row**: control the file format.
Click **Export CSV**. A live counter shows **Exported N products** as the file streams, then it downloads to your browser.
Your CSV is downloaded with the columns and order you configured. The modal stays open so you can run another export with different settings.
## Advanced configuration
You don't have to use a template. In the **Export to CSV** modal, use the other tabs to assemble columns directly:
* **Attributes**: all attribute values, split into category and product attributes. Search to filter, drag to reorder, and edit the output header per column.
* **Identifiers**: SKU, GTIN, MPN, and any custom identifier types.
* **Product fields** are the built-in properties: **Title**, **Product ID**, **Parent ID**, and **Parent Identifier**.
* **Product children**: set **Min** and **Max** child levels to expand matched products into their variants. Leaving **Max** empty includes all descendants.
* **Integrations**: per-integration properties (for example Shopify metafields), shown when at least one integration is connected.
To refresh products, open the import from the **CSV Import** tab and upload a new file. The sync mode decides whether Cernel creates new products and updates existing ones (**Full Sync**) or only updates existing ones (**Update Only**). Keep the same columns in the same order as the original file so the saved mapping still applies.
Reuse a configuration you've already proven instead of rebuilding it:
* **Use an existing import as a template** with the row's **Use as template for new import** action. Cernel starts a new import and matches your uploaded file's columns to the original by name: columns that match keep their original mapping, and columns with no match start unmapped in **Skipped columns**, ready for you to map. The new file no longer has to carry the exact same columns in the same order, so you can reuse a proven setup even when a vendor sends a slightly different file. Nothing is saved until you run the import. (Imports created before April 1, 2026 can't be used as a template; start a new import instead.)
* **Duplicate an export template** to create a new template with the same columns, mappings, and settings. The copy opens ready to edit, with the name pre-filled as "{original} copy".
On the Products page you can filter by **CSV import source** to see only the products that came from a specific file. Use it to audit a vendor's upload or to confirm a fresh import landed as expected.
An import matches rows to existing products using the columns you mapped as **product identifiers**. If identifier values change between imports, Cernel can't recognize the same product and may create duplicates instead of updating. Keep identifier columns stable across imports.
## Frequently asked questions
Cernel imports `.csv` files, up to **200 MB per file**. The delimiter (comma, semicolon, tab, or pipe) is detected automatically; if it can't be detected, you pick it during upload. If your file is larger than 200 MB, split it into multiple smaller files and import them into the same integration.
Auto-detection works best on clean, standard CSVs. If columns come in misaligned or the import looks off, set the delimiter manually and make sure the file is saved as UTF-8.
This is a text-encoding issue, not a mapping mistake. Cernel reads **UTF-8** files (with or without a byte-order mark), and **UTF-16** or **UTF-32** files that begin with a byte-order mark. An Excel **CSV UTF-8** export imports as-is: its leading byte-order mark used to attach to the first header name so that column matched nothing and quietly dropped, and it now maps correctly.
If Cernel can't determine a file's encoding, it stops the import and asks you to re-save rather than importing scrambled text. In your spreadsheet application, choose **Save As**, then **CSV UTF-8**, and upload again. A plain **Unicode Text** export (UTF-16 without a byte-order mark) is one common case that gets refused this way.
You can run Cernel on CSV alone, with no Shopify, PIM, or API connection required. Import your catalog as a CSV, enrich it, and export the enriched data back out as a CSV. Many customers operate this way long-term. A live integration (Shopify, Struct, API) adds two-way sync and removes the manual upload/download step, but it's optional.
Choose **From catalog** when you manage products in one system and want a clean round trip: you send a file, Cernel enriches it, and you get updates back in the same layout. Choose **From vendor** when different suppliers send you files in different shapes and you want Cernel to map each one into a single, consistent catalog.
The import needs at least one column mapped as a **product identifier** and one column set as the **product title**. The review step also blocks if two columns map to the same attribute, or if an identifier row still needs a type. Resolve the highlighted rows and the **Run import** button enables.
Unrecognized columns are listed as **skipped** and aren't imported by default. Add the ones you want with **Add to imported columns**, mapping each to an existing attribute or creating a new one. Leave the rest skipped to ignore them.
Product images come in as **URLs**, not file uploads. Add a column that holds a public image URL for each product, then map it under the **Images** section during column mapping. Each value is imported as a product image in Cernel, and Cernel only treats a column as image URLs when its values are real links (they contain `http://` or `https://`).
If you have image files but no URLs yet, host them somewhere that gives a stable, direct link first (your Shopify store or another connected commerce platform, or a public storage bucket or CDN), then put those links in the column. A Google Drive "share" link won't work, because it opens a viewer page rather than pointing straight at the image file.
Save the column layout as a **CSV export template**, then select it on the **Templates** tab of the Export to CSV modal each time. Templates keep your headers and column order consistent for whatever system reads the file.
In the Export to CSV modal, open **Product children**. **Min** and **Max** control how many variant levels are included relative to the matched products. Setting **Min** to `0` and leaving **Max** empty includes the matched products plus every descendant; setting **Min** to `1` exports only children.
Two or more columns share the same output header. A CSV can't carry duplicate headers meaningfully: the last value written wins, so earlier columns are lost. Rename one of the conflicting columns so each output header is unique.
## What's next
See how Cernel classifies your imported products into categories, ready for enrichment.
Start generating AI content for your imported products.
Set the file basics and download:
* **File name**: defaults to the current category; the `.csv` suffix is added automatically.
* **Export language**: pick one enabled language. The primary language is marked **(Primary)**.
* **Delimiter** and **Include header row**: control the file format.
Click **Export CSV**. A live counter shows **Exported N products** as the file streams, then it downloads to your browser.
Your CSV is downloaded with the columns and order you configured. The modal stays open so you can run another export with different settings.
## Advanced configuration
You don't have to use a template. In the **Export to CSV** modal, use the other tabs to assemble columns directly:
* **Attributes**: all attribute values, split into category and product attributes. Search to filter, drag to reorder, and edit the output header per column.
* **Identifiers**: SKU, GTIN, MPN, and any custom identifier types.
* **Product fields** are the built-in properties: **Title**, **Product ID**, **Parent ID**, and **Parent Identifier**.
* **Product children**: set **Min** and **Max** child levels to expand matched products into their variants. Leaving **Max** empty includes all descendants.
* **Integrations**: per-integration properties (for example Shopify metafields), shown when at least one integration is connected.
To refresh products, open the import from the **CSV Import** tab and upload a new file. The sync mode decides whether Cernel creates new products and updates existing ones (**Full Sync**) or only updates existing ones (**Update Only**). Keep the same columns in the same order as the original file so the saved mapping still applies.
Reuse a configuration you've already proven instead of rebuilding it:
* **Use an existing import as a template** with the row's **Use as template for new import** action. Cernel starts a new import and matches your uploaded file's columns to the original by name: columns that match keep their original mapping, and columns with no match start unmapped in **Skipped columns**, ready for you to map. The new file no longer has to carry the exact same columns in the same order, so you can reuse a proven setup even when a vendor sends a slightly different file. Nothing is saved until you run the import. (Imports created before April 1, 2026 can't be used as a template; start a new import instead.)
* **Duplicate an export template** to create a new template with the same columns, mappings, and settings. The copy opens ready to edit, with the name pre-filled as "{original} copy".
On the Products page you can filter by **CSV import source** to see only the products that came from a specific file. Use it to audit a vendor's upload or to confirm a fresh import landed as expected.
An import matches rows to existing products using the columns you mapped as **product identifiers**. If identifier values change between imports, Cernel can't recognize the same product and may create duplicates instead of updating. Keep identifier columns stable across imports.
## Frequently asked questions
Cernel imports `.csv` files, up to **200 MB per file**. The delimiter (comma, semicolon, tab, or pipe) is detected automatically; if it can't be detected, you pick it during upload. If your file is larger than 200 MB, split it into multiple smaller files and import them into the same integration.
Auto-detection works best on clean, standard CSVs. If columns come in misaligned or the import looks off, set the delimiter manually and make sure the file is saved as UTF-8.
This is a text-encoding issue, not a mapping mistake. Cernel reads **UTF-8** files (with or without a byte-order mark), and **UTF-16** or **UTF-32** files that begin with a byte-order mark. An Excel **CSV UTF-8** export imports as-is: its leading byte-order mark used to attach to the first header name so that column matched nothing and quietly dropped, and it now maps correctly.
If Cernel can't determine a file's encoding, it stops the import and asks you to re-save rather than importing scrambled text. In your spreadsheet application, choose **Save As**, then **CSV UTF-8**, and upload again. A plain **Unicode Text** export (UTF-16 without a byte-order mark) is one common case that gets refused this way.
You can run Cernel on CSV alone, with no Shopify, PIM, or API connection required. Import your catalog as a CSV, enrich it, and export the enriched data back out as a CSV. Many customers operate this way long-term. A live integration (Shopify, Struct, API) adds two-way sync and removes the manual upload/download step, but it's optional.
Choose **From catalog** when you manage products in one system and want a clean round trip: you send a file, Cernel enriches it, and you get updates back in the same layout. Choose **From vendor** when different suppliers send you files in different shapes and you want Cernel to map each one into a single, consistent catalog.
The import needs at least one column mapped as a **product identifier** and one column set as the **product title**. The review step also blocks if two columns map to the same attribute, or if an identifier row still needs a type. Resolve the highlighted rows and the **Run import** button enables.
Unrecognized columns are listed as **skipped** and aren't imported by default. Add the ones you want with **Add to imported columns**, mapping each to an existing attribute or creating a new one. Leave the rest skipped to ignore them.
Product images come in as **URLs**, not file uploads. Add a column that holds a public image URL for each product, then map it under the **Images** section during column mapping. Each value is imported as a product image in Cernel, and Cernel only treats a column as image URLs when its values are real links (they contain `http://` or `https://`).
If you have image files but no URLs yet, host them somewhere that gives a stable, direct link first (your Shopify store or another connected commerce platform, or a public storage bucket or CDN), then put those links in the column. A Google Drive "share" link won't work, because it opens a viewer page rather than pointing straight at the image file.
Save the column layout as a **CSV export template**, then select it on the **Templates** tab of the Export to CSV modal each time. Templates keep your headers and column order consistent for whatever system reads the file.
In the Export to CSV modal, open **Product children**. **Min** and **Max** control how many variant levels are included relative to the matched products. Setting **Min** to `0` and leaving **Max** empty includes the matched products plus every descendant; setting **Min** to `1` exports only children.
Two or more columns share the same output header. A CSV can't carry duplicate headers meaningfully: the last value written wins, so earlier columns are lost. Rename one of the conflicting columns so each output header is unique.
## What's next
See how Cernel classifies your imported products into categories, ready for enrichment.
Start generating AI content for your imported products.