How it works
The CSV integration reads product data from a CSV file. You provide the file, Cernel detects the structure, and you map source columns to Cernel attributes. Products are imported and ready for enrichment. For export, you configure which attributes to include and Cernel generates a downloadable CSV with your enriched product data.Why you would use this
Import from any source
If your product data lives in a spreadsheet - from a supplier, an ERP system, or a manual catalog - you can import it directly without needing a platform integration.
Export enriched data anywhere
Download your AI-enriched product content as a CSV for use in any system that accepts spreadsheet imports.
Importing products from CSV
Navigate to Integrations
Go to Tools > Integrations and click Add Integration. Select Spreadsheet (CSV).
Configure the integration
Fill in the basic settings:
- Integration Name - A descriptive name for this import source
- File Language - The language of the content in your file
- URL - Enter the URL of a hosted CSV file
- Upload File - Drag and drop or browse to upload a CSV file
Configure advanced settings (optional)
Expand Advanced Settings to configure:
- Sync Mode - Full Sync (replace all products) or Update Only (only update existing products)
- CSV Delimiter - Auto-detect, comma, semicolon, tab, or pipe
- Include All Fields - Import all columns, not just those identified by AI
Map columns to Cernel attributes
After uploading, Cernel analyzes your file and shows the Attribute Mapping view. Map your source columns (left) to Cernel attributes (right) to control how data is imported.
Exporting enriched data as CSV
You can export product data to CSV in two ways:- On-demand from the products table — pick a product set, configure columns once, and download a CSV immediately. Use this for ad-hoc exports, sharing data with a colleague, or sanity-checking attribute coverage.
- As a saved integration — define a reusable export configuration in Settings > Integrations. Use this when the same export needs to run repeatedly, or when a downstream system pulls the file on a schedule.
On-demand export from the products table
Open the products table and pick your scope
Navigate to a category in the Products sidebar. Select specific rows with the checkboxes — the export honors your current filters and selection.
Open the Export to CSV modal
From the products toolbar, open the burger menu and click Export to CSV. The button label shows the scope, for example Export to CSV (24) for an explicit selection or Export to CSV (All matching - 1,250) when filters are applied.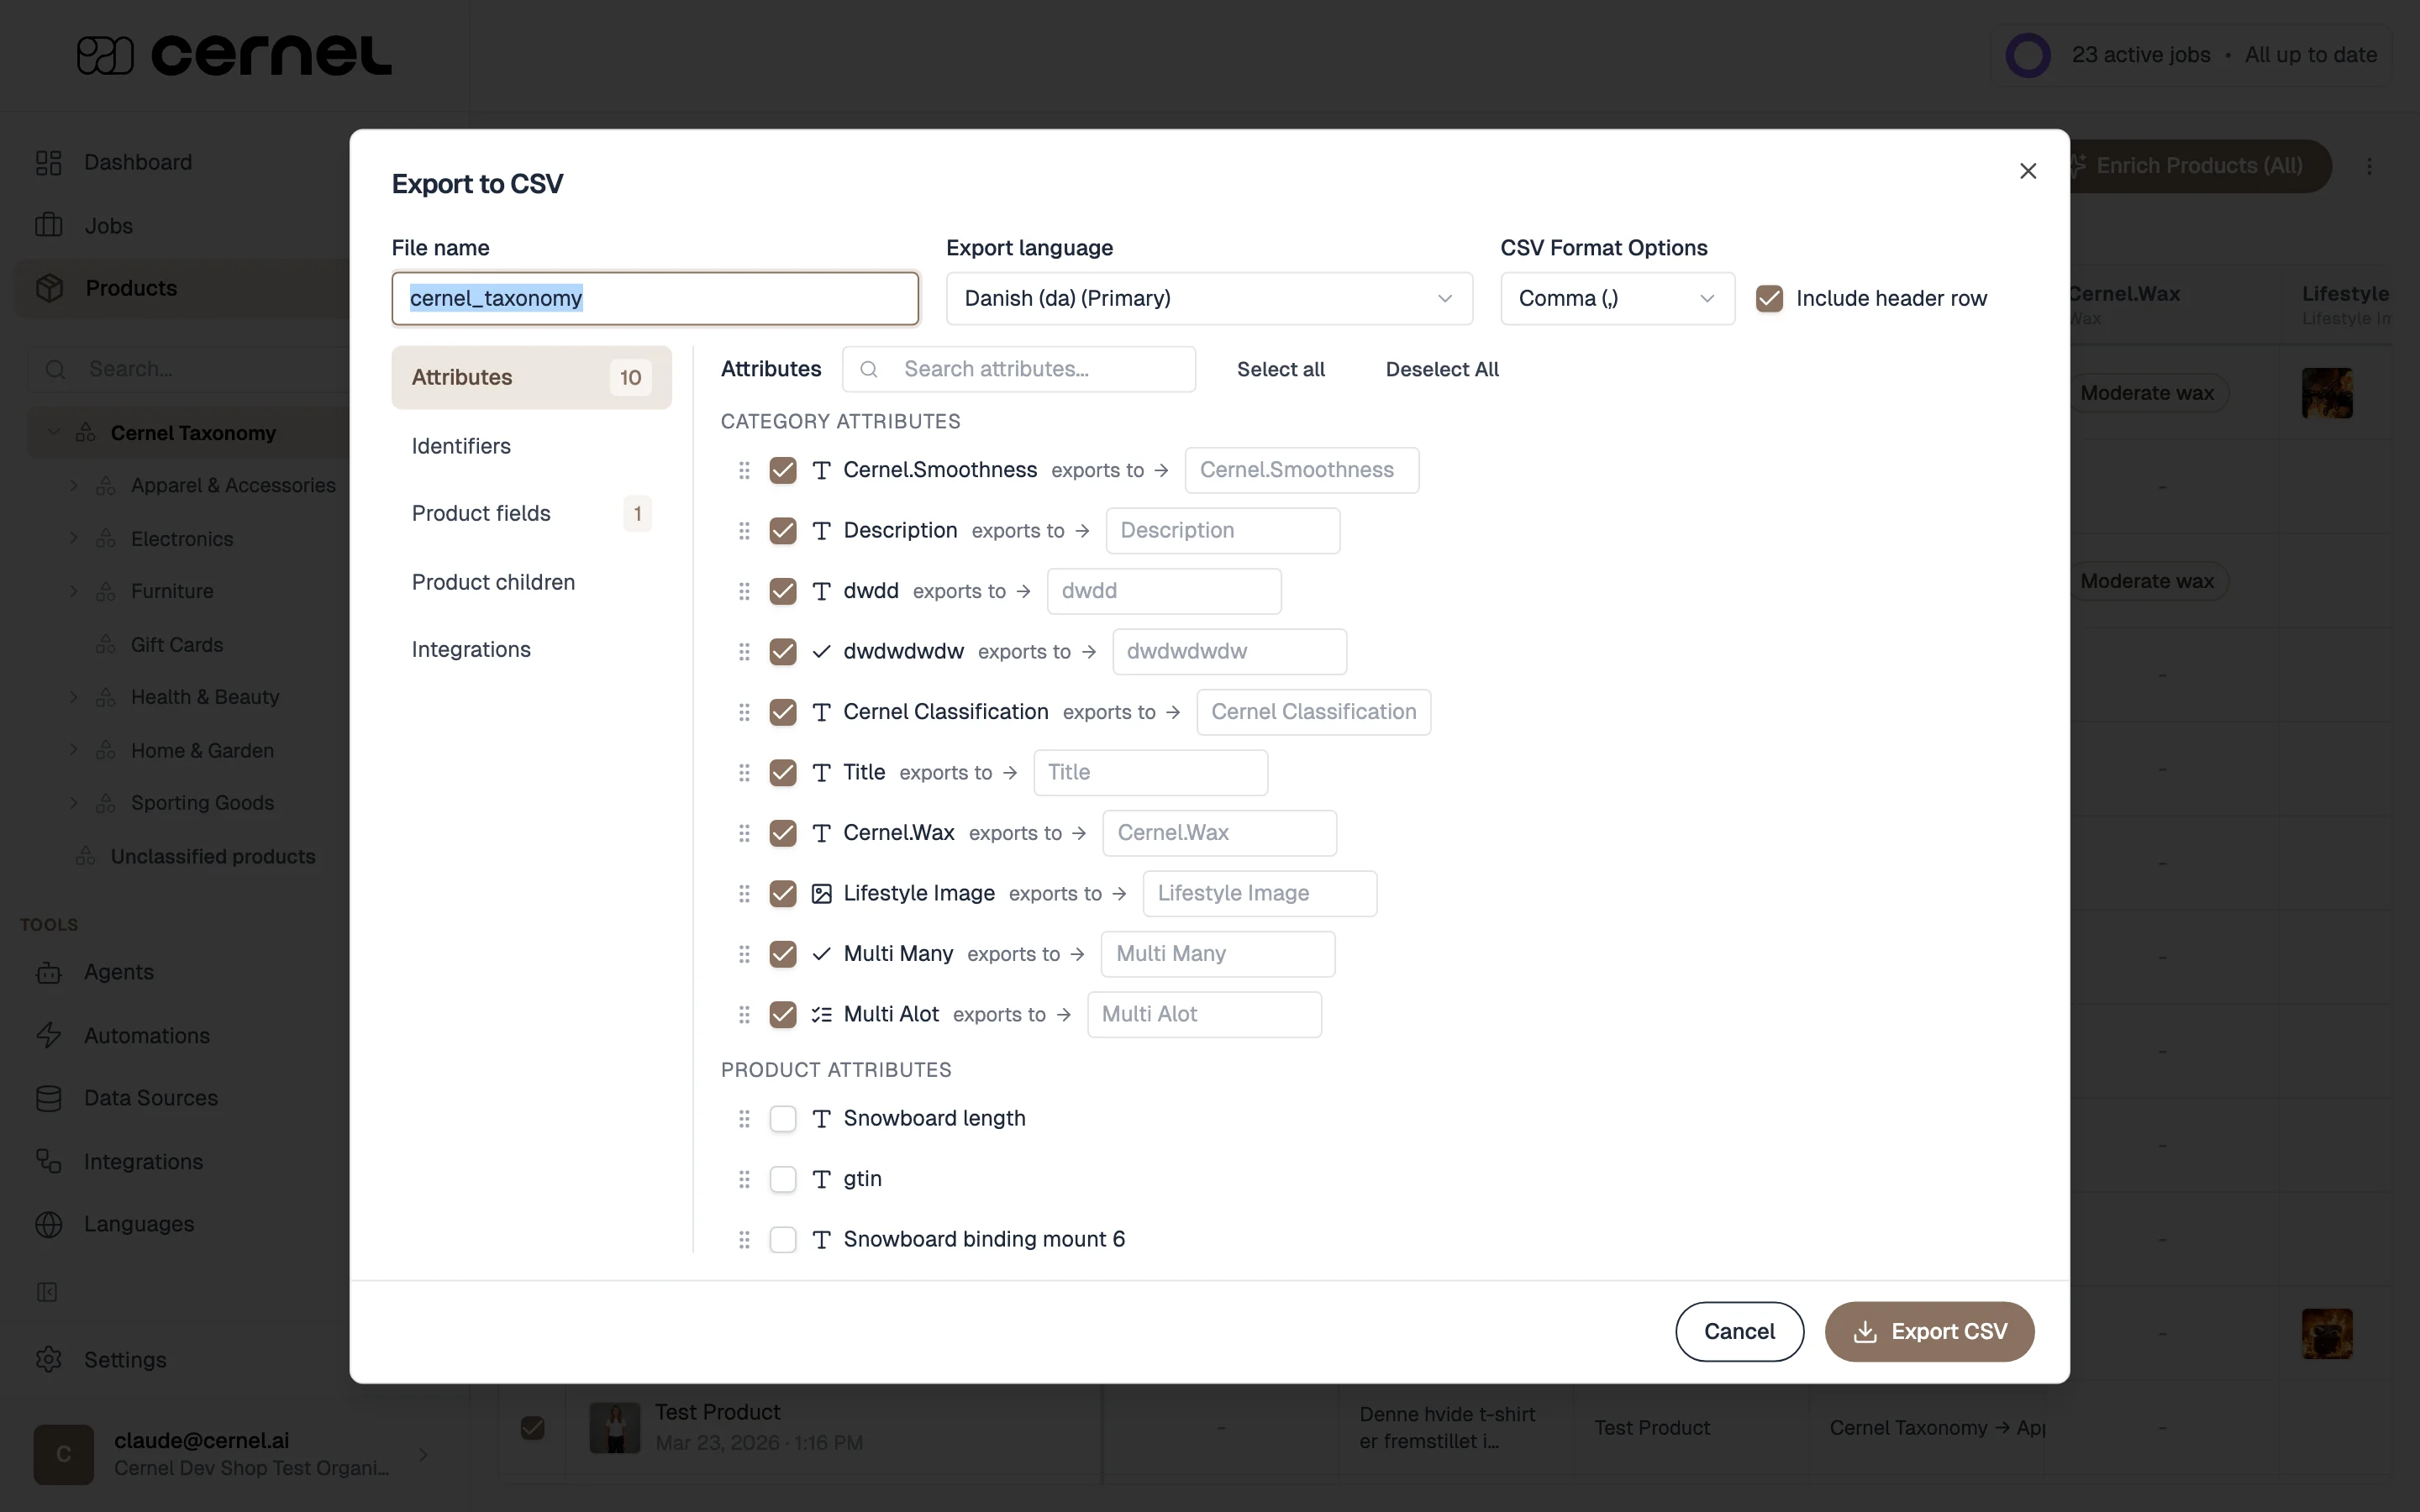
Set the basics
The top row controls the file metadata and output format:
- File name - Defaults to a slug of the current category (e.g.
cernel_taxonomy). The.csvsuffix is added automatically. - Export language - Pick one enabled language. The primary language is marked (Primary).
- CSV Format Options - Choose the Delimiter (comma, semicolon, tab, or pipe) and toggle Include header row.
Pick the columns to export
Use the left-hand sidebar to switch between column groups. Each tab shows a count of selected items so you can see your column total at a glance.
- Attributes - All Cernel attribute values, split into Category attributes and Product attributes. Search to filter, drag the handle to reorder, and edit the exports to name to override the column header. Use Select all / Deselect all at the top of each section.
- Identifiers - SKU, GTIN, MPN, and any custom product identifier types. Add a one-off custom identifier in the field at the bottom.
- Product fields - Built-in product properties: Title, Product ID, Parent ID, and Parent Identifier.
- Product children - Controls how variants are included. Set Min and Max child levels to expand matched products into their hierarchy. Leaving Max empty includes all descendants.
- Integrations - Per-integration properties (for example Shopify metafields). Each integration appears as a collapsible section with its own search and select-all controls. This tab only shows when at least one integration is connected.
Download the CSV
Click Export CSV at the bottom of the modal. The button label changes to Exporting… and a live counter on the button shows Exported N products as the file streams — so for large catalogs you can see progress rather than waiting on a spinner. When the export finishes, the CSV downloads directly to your browser. The modal stays open while the export runs so you can keep adjusting columns for a follow-up export.
Your CSV is downloaded with the columns and order you configured. Re-open the modal to run the export again with different settings.
Saved CSV export integration
Add an export configuration
In Tools > Integrations, click Add Integration and select Export Data. Choose CSV Export as the format.
Configure the export
Set up your export:
- Export Name - A descriptive name
- Export Language - Which language to export
- Base on Existing Integration (optional) - Use field mappings from an existing integration as a starting point
- Export Field Mapping - Configure which Cernel attributes to include and their output column names
Frequently asked questions
What file formats are supported for import?
What file formats are supported for import?
Cernel supports CSV (
.csv) files. The delimiter is auto-detected by default, but you can specify it manually if needed (comma, semicolon, tab, or pipe).Can I re-import an updated file?
Can I re-import an updated file?
Yes. Use the same integration and upload a new file. The sync mode determines whether Cernel replaces all products (Full Sync) or only updates existing ones (Update Only).
What happens if my CSV has columns Cernel doesn't recognize?
What happens if my CSV has columns Cernel doesn't recognize?
By default, Cernel only imports columns that it can map to known fields. Enable Include All Fields in advanced settings to import all columns, even those not automatically identified.
Can I import from a URL that updates automatically?
Can I import from a URL that updates automatically?
Yes. If you provide a URL, Cernel can re-fetch the file to sync updated product data. This is useful for supplier feeds or automated exports from other systems.
When should I use the on-demand export vs. a saved integration?
When should I use the on-demand export vs. a saved integration?
Use the on-demand export from the products table for one-off exports — sharing a CSV with a colleague, double-checking attribute coverage on a category, or pulling a snapshot for a presentation. Use a saved CSV Export integration when the same export needs to run repeatedly, when a downstream system fetches the file on a schedule, or when you want a single, named export configuration that everyone in the workspace uses.
Why does the modal show 'All matching - 1,250' instead of a number I selected?
Why does the modal show 'All matching - 1,250' instead of a number I selected?
The export honors the current product filter and your selection mode. Tick specific rows to narrow it down to an explicit selection, or use the Select all matching toggle in the products toolbar to invert the selection.
How do I export product variants alongside their parents?
How do I export product variants alongside their parents?
Open the Product children tab in the export modal. Min and Max control how many variant levels are included relative to the matched products. Setting Min to
0 and Max to empty includes the matched products plus every descendant. Setting Min to 1 exports only children, skipping the matched products themselves.Why are some attribute names highlighted in red?
Why are some attribute names highlighted in red?
Two or more rows share the same exports to name. CSV files can’t have duplicate headers in a meaningful way — the last value written wins, so the earlier columns are silently lost. Rename one of the conflicting rows so each column has a unique output header.
What’s next
Cernel Taxonomy
See how Cernel automatically classifies your imported products into categories, ready for enrichment.
Enriching Products
Start generating AI content for your imported products.